dvanalysis is part of the dvrescue toolkit. It is used to perform quality control on files transferred from DV videotapes, including previewing possible options for segmenting files according to various parameters. dvanalysis utilizes the XML data (created during capture) that documents the transfer events and subsequent evaluation of a DV file. The dvanalysis interface facilitates three ways of interacting with that DV data, as well as a variety of parameters to view specific portions of the data in a variety of ways according to the recording events detected.
Using a combination of the dvrescue tools in both the GUI and command line, you can review the file for artifacts and determine the cause and any possible solutions. The DV Artifacts documentation page lists artifacts that are common for DV videotapes, methods for identifying the artifacts during and after capture using dvrescue tools, whether they can be resolved, and, if so, how to fix them. You can also peruse the A/V Artifact Atlas for more artifacts.
How to analyze files using the DVRescue GUI
GUI Navigation
GUI Navigation
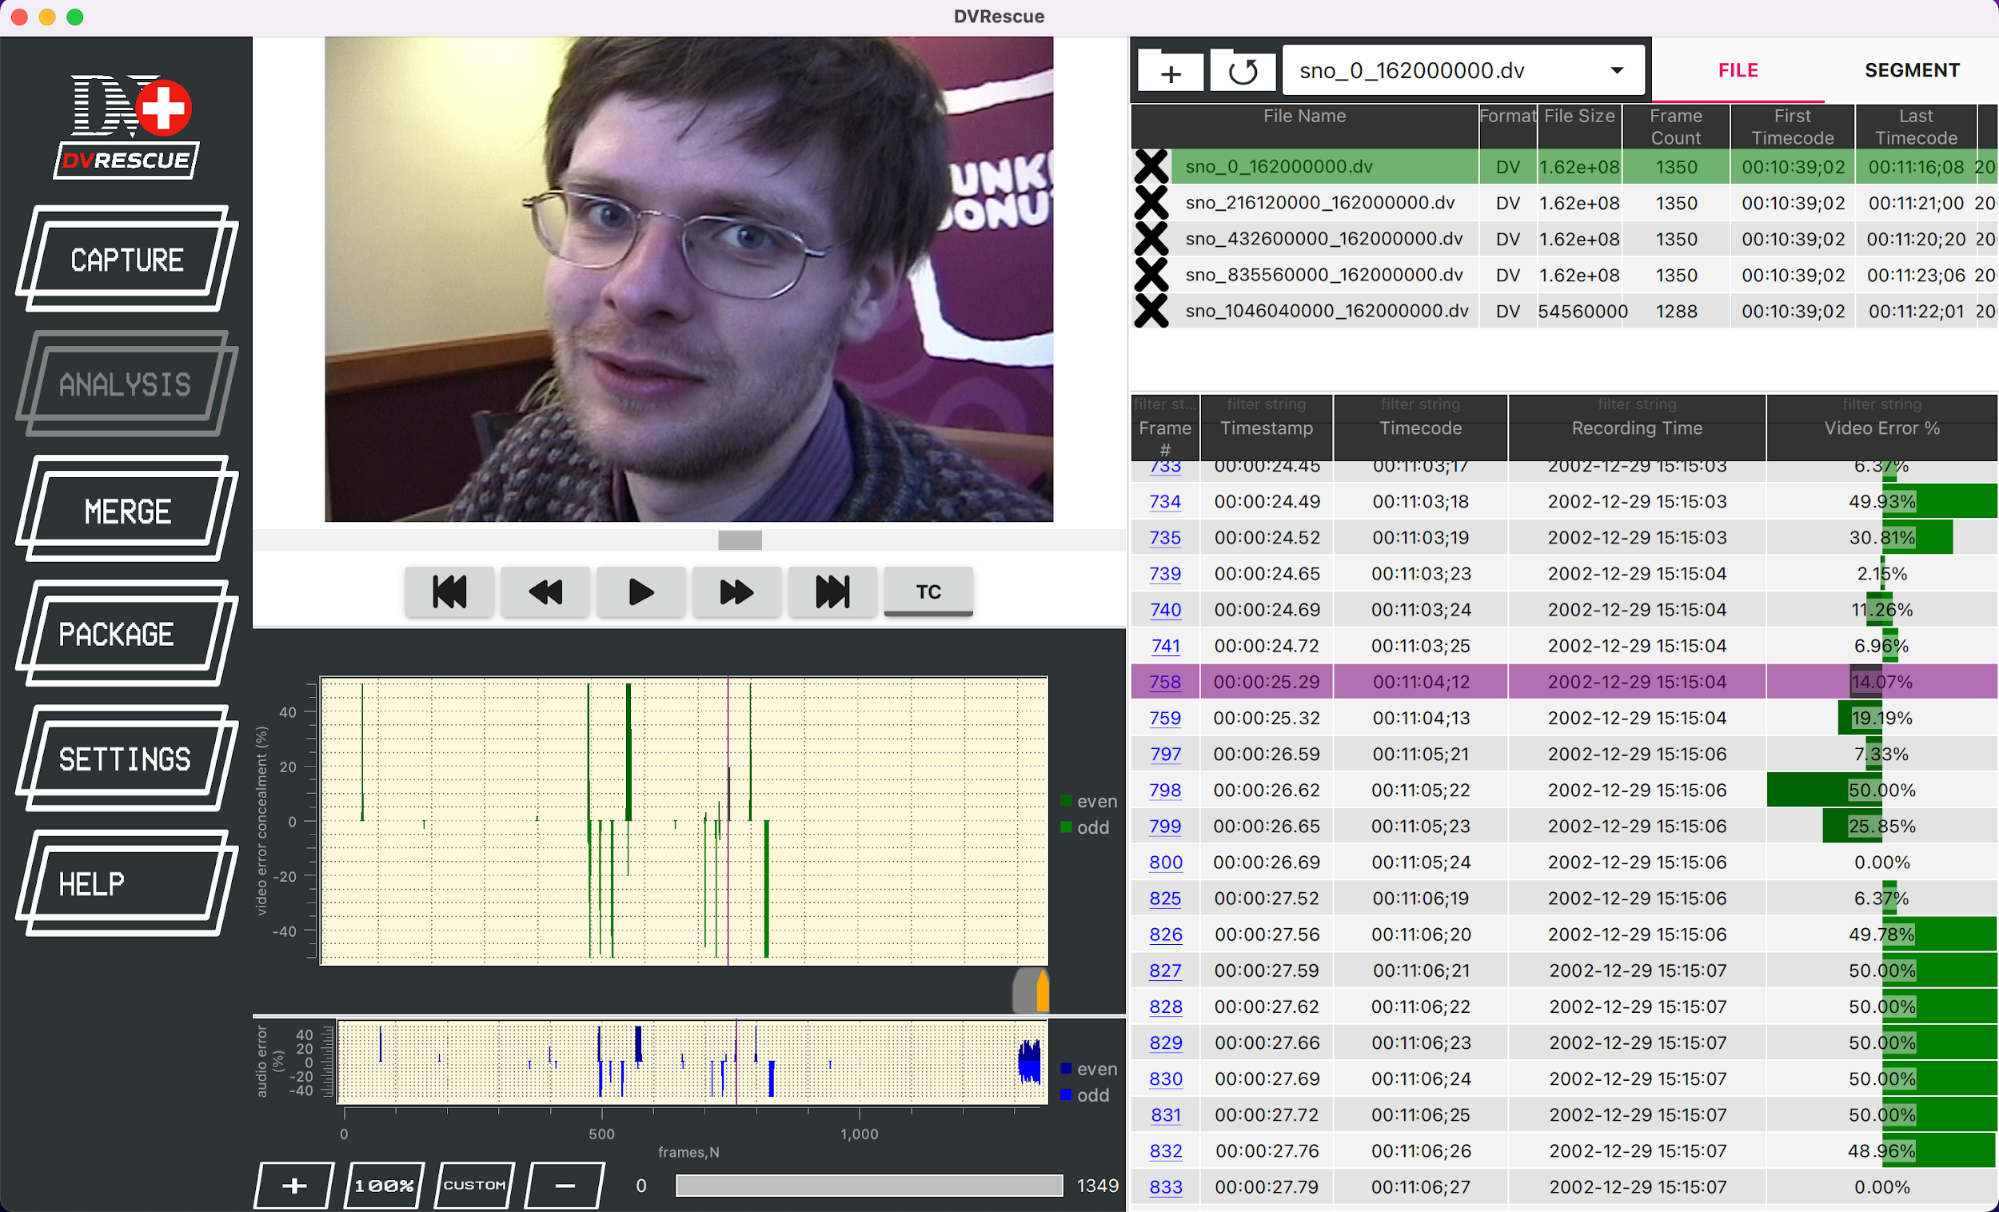
Viewer
The viewer works similarly to any other playback tool, such as ffplay. You can play, pause, skip forward or backward in the video, as well as toggle a subtitle track on and off. Using the dvplay filters enables the user to view issues present in the file such as missing blocks and frames, as well as artifacts including headclogs, scratches and dropouts.
Timeline Graphs
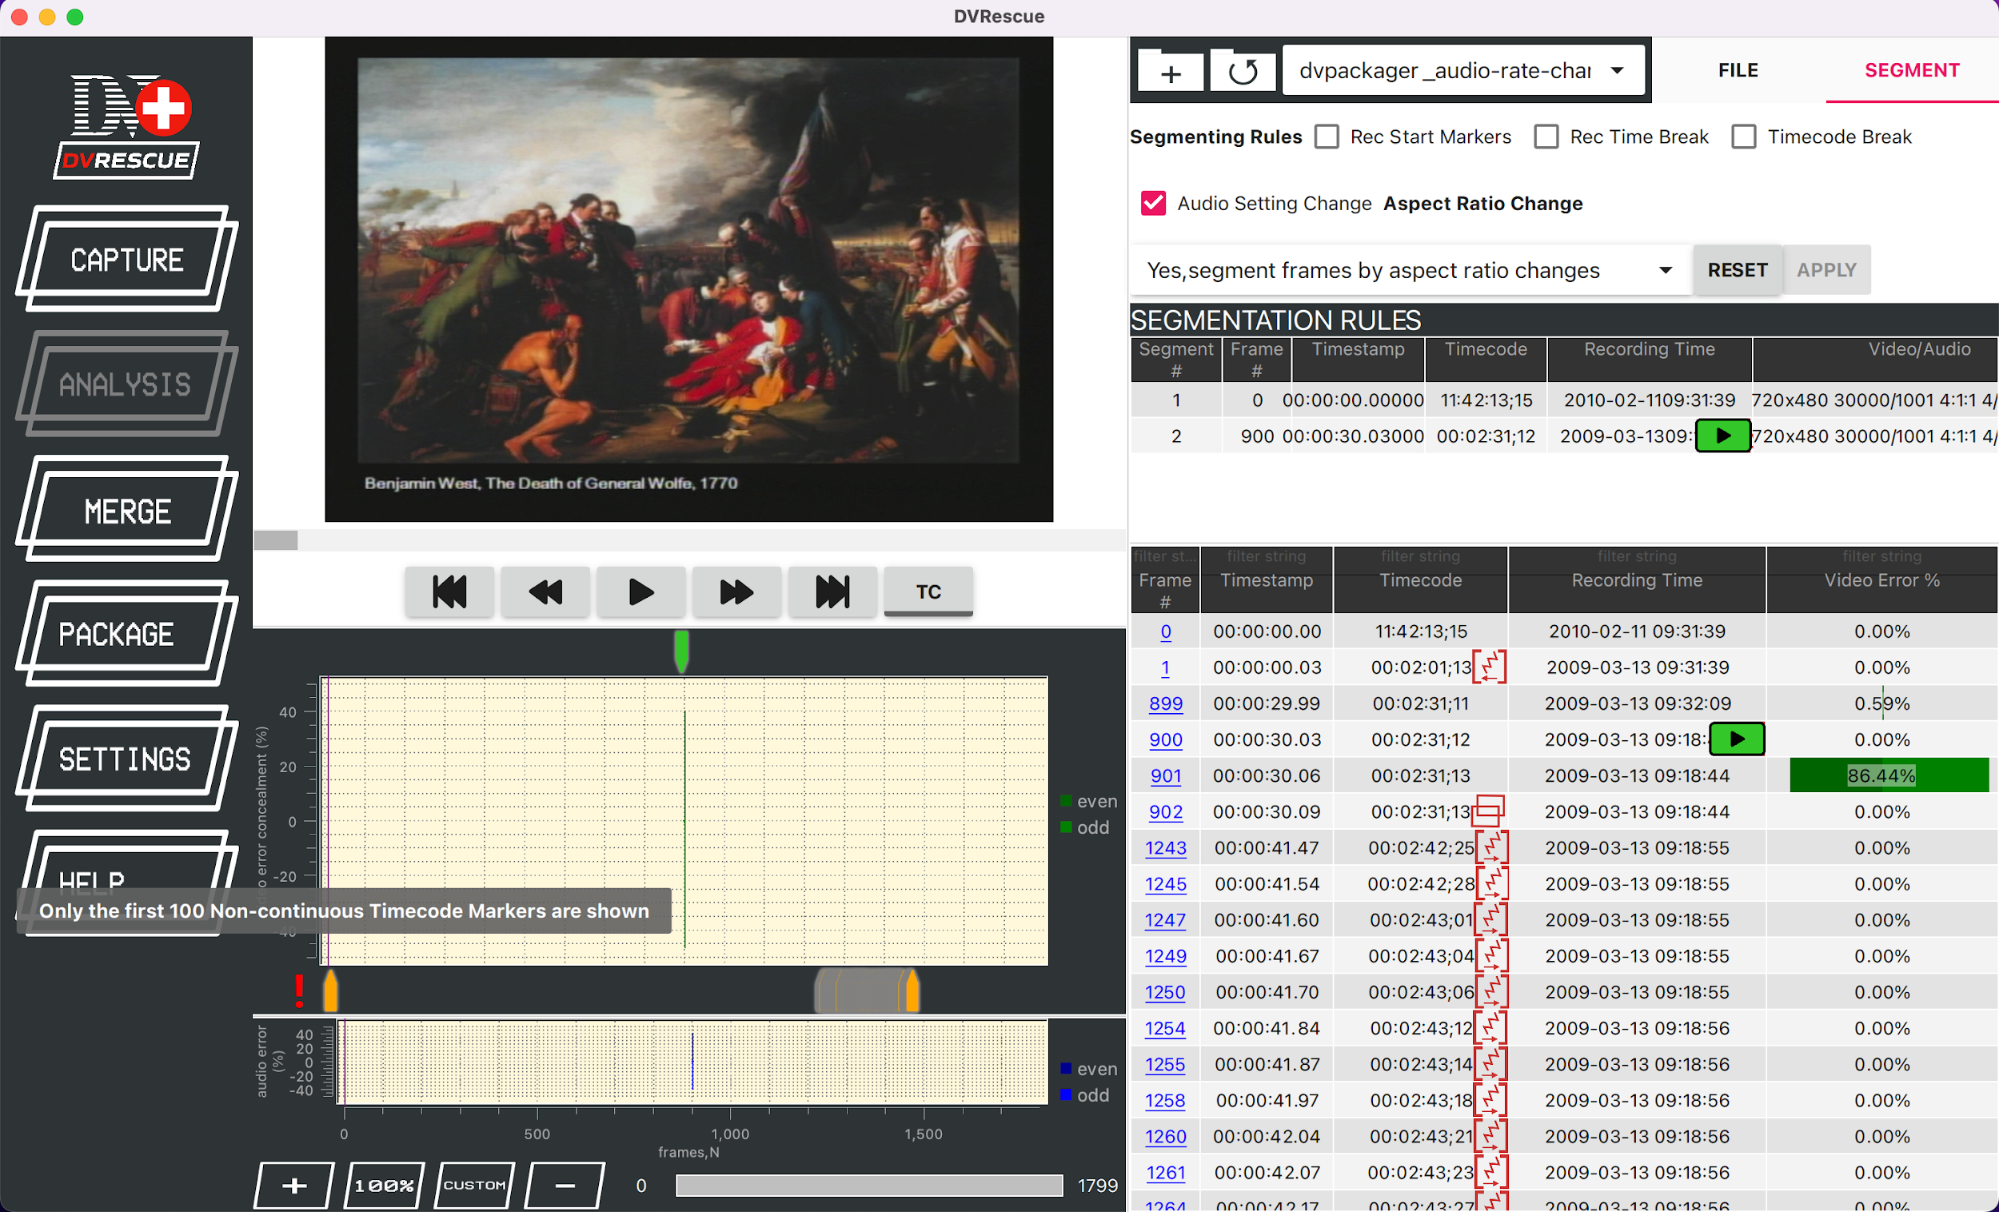
These graph views plot the frames throughout the video file. There is one interface for video and a separate one, below, for audio. They depict the timeline of a DV file and show the rate of video and audio error concealment over that timeline along with recording events such as start and stop markers and jumps in timecodes.
If there are more than 100 frames with errors, the graph will only depict the first 100, to avoid crashing the program.
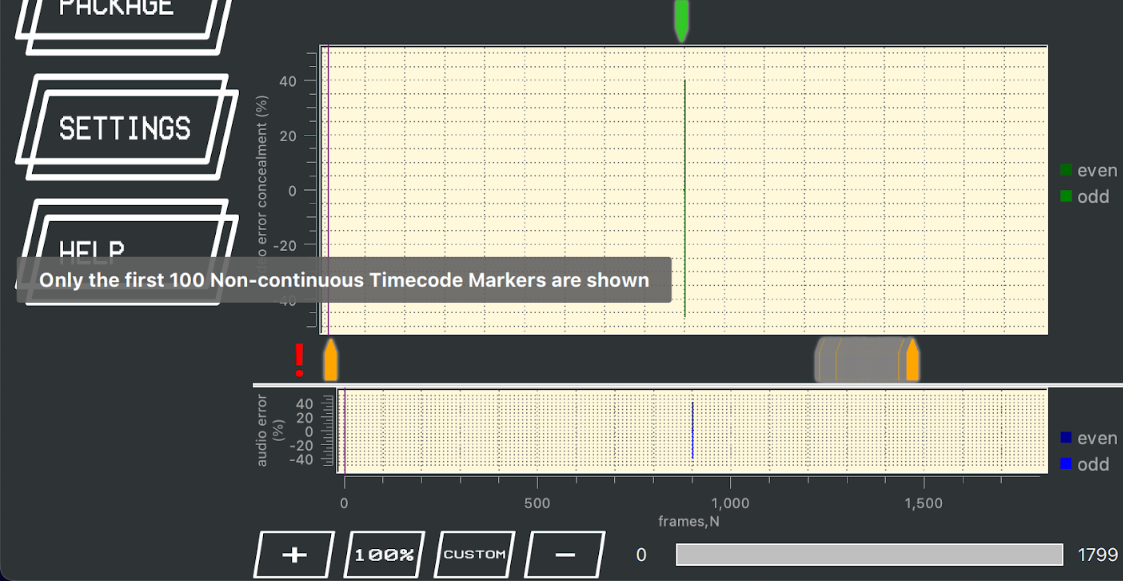
Below the graphs you can zoom in and out to focus on certain parts of the timeline.
Frame Table
The table view contains a complete list of interesting frames. By “interesting” we mean that the frame either contains an error, a record marker, or a recording setting change that has occurred.
It lists the frame number, out of all of the frames in the entire video. It also lists the timestamp and timecode, along with an icon showing why the frame was interesting. See the Icon Key below. To the far right, it shows the percentage of the video that had an error, if any.
The frame number on the far left is a link. Clicking it opens the dvloupe pop-up screen (see below). Clicking any other part of the row will cause the video viewer to jump to that point in the video.
Icon Key
In the table, a variety of icons will appear next to frames to flag various errors, markers and changes for the user. Below is a list of the icons, with corresponding images and descriptions.

- substantial change: this icon will appear next to a frame marking a significant change in recording settings such as aspect ratio or audio rate change. Consider using these as potential ways to package your file to accommodate a variety of playback settings.
- repeat frame: a frame is a repeat of the one prior to or after it.
- non-continuous jump: a jump/break in the timecode occurred
- ahead: a break in the recording time occurred, with the flagged non-continuous part starting after the previous continuous content of the tape.
- back: a break in the recording occurred, with the flagged non-continuous part starting prior the previous continuous content of the tape.
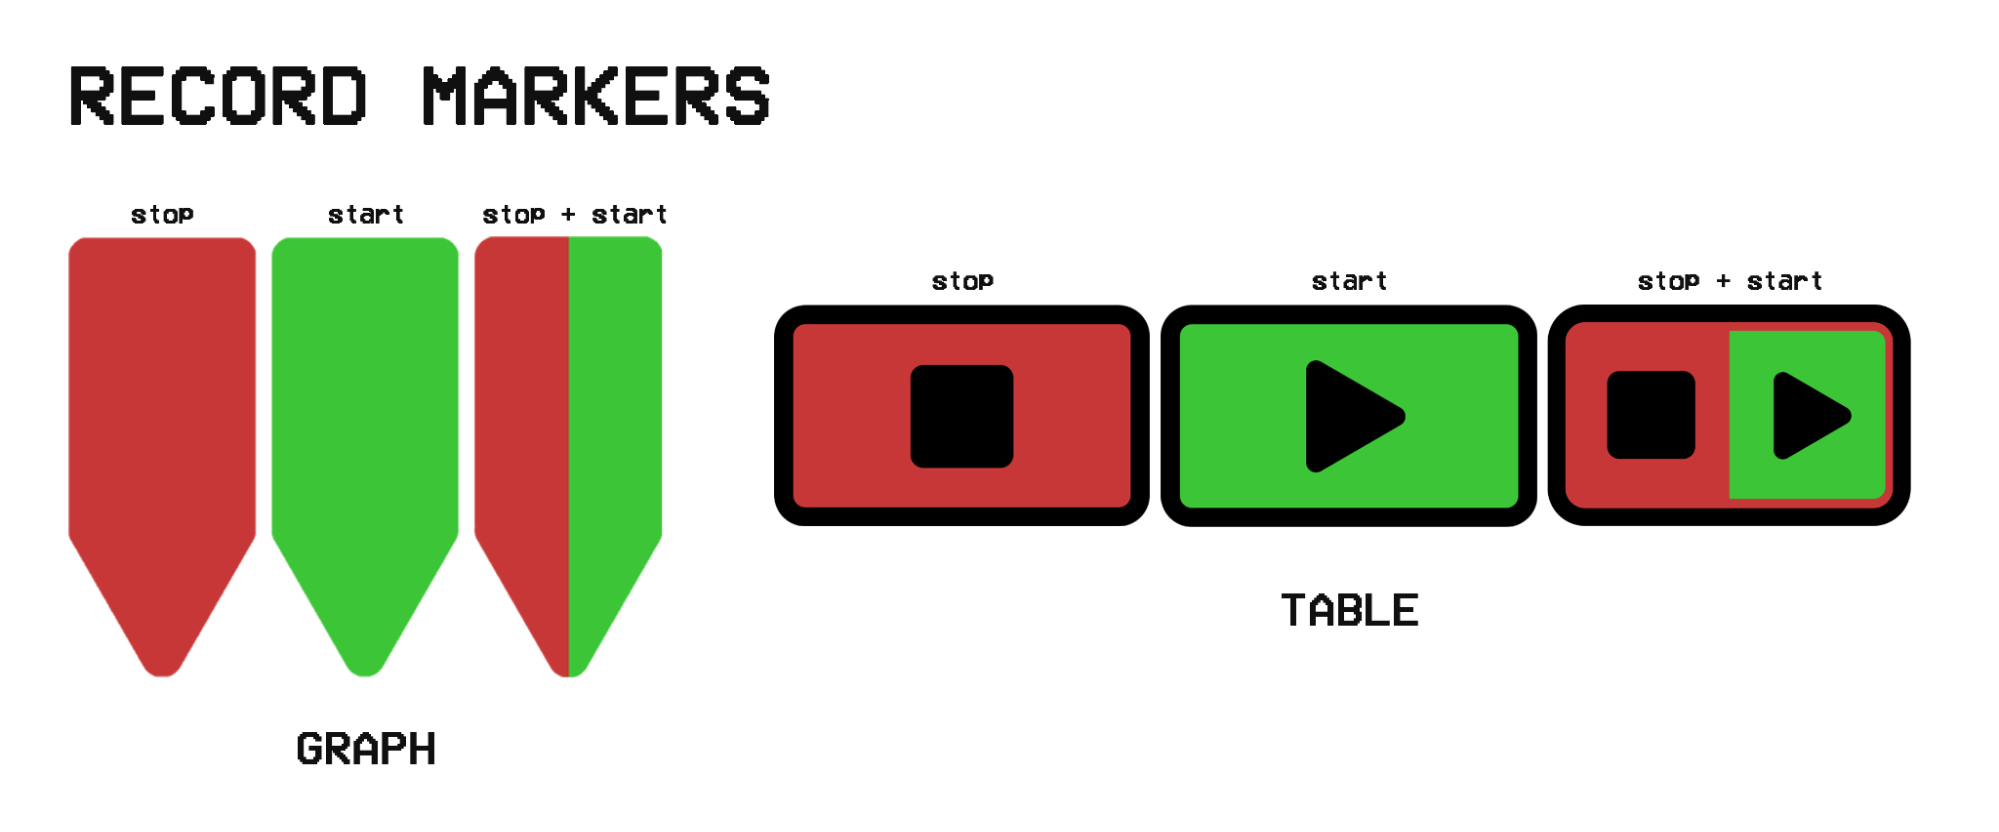
- Record markers: flags indicating the beginning or end of a recording. Some camcorders use both stop and start flags, but most use one or the other. This can be helpful for finding the beginning or end of segments that were recorded separately. It can also help with packaging, if you prefer the segments of content in separate files.
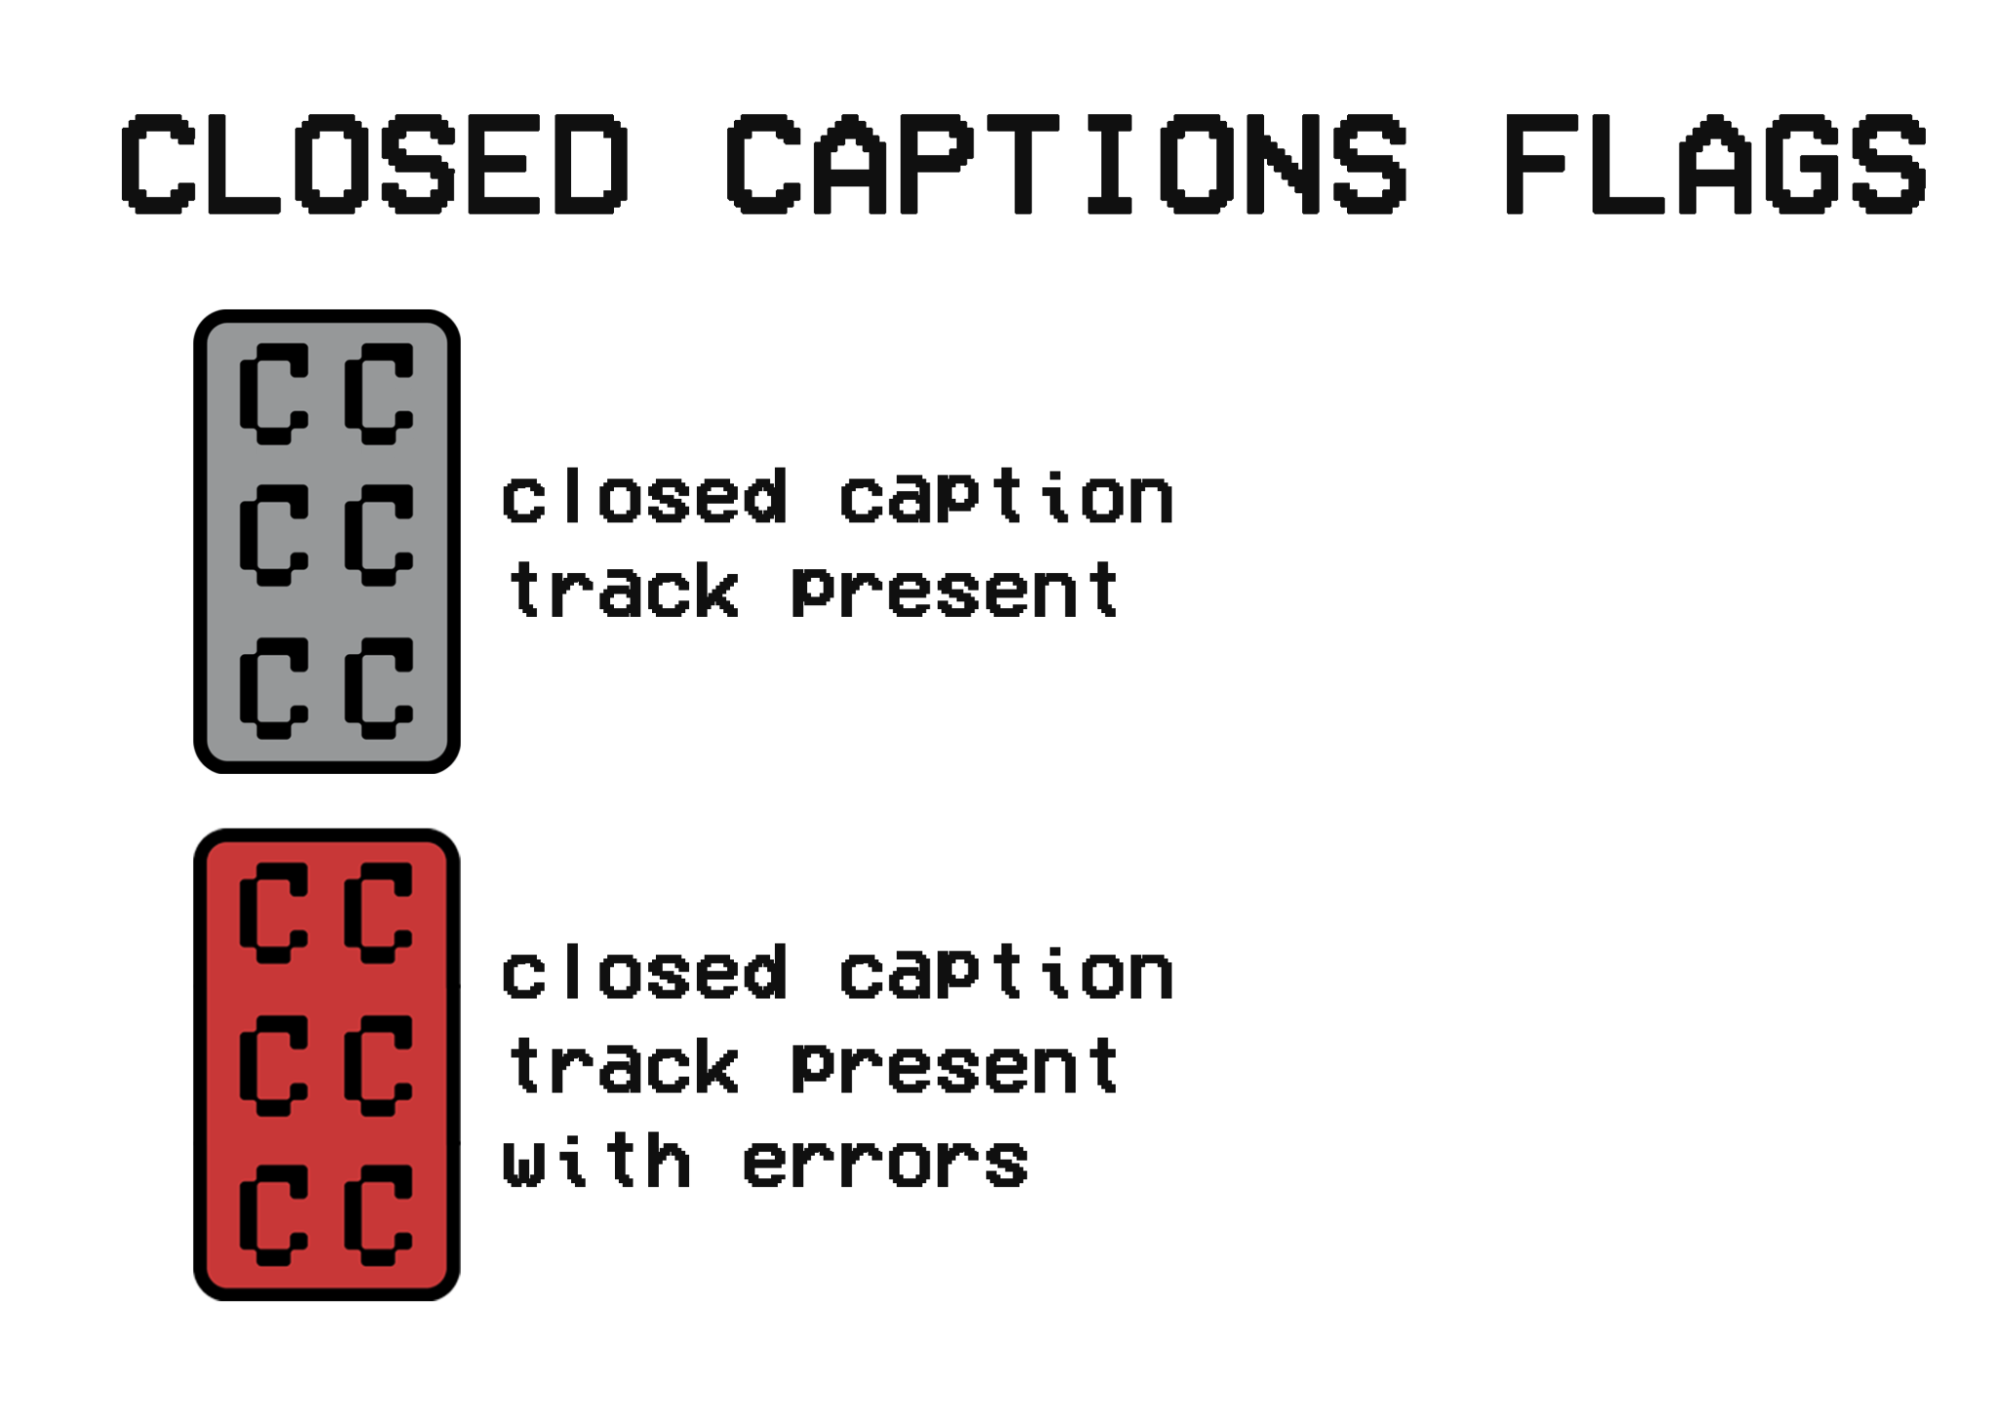
- Closed caption flags: if closed caption tracks are present in the DV file data, these will appear next to the associated frames in the table list. If there are errors in the caption track, it will be red. If the caption track is fine, they will be gray.
dvloupe
If you click on a frame listed in the Frame Table, a separate preview window will open with the dvloupe viewer. dvloupe will show the frame without any error concealment. All of the errors in the frame are highlighted yellow to make them easy to see.
dvloupe also shows you all of the bits of the DV stream in a hexadecimal view. These bits are color-coded for ease of reading.you can read about dvloupe in more detail in <href=”https://mipops.tumblr.com/post/625667299610853376/dvrescue-workshop-1-dvpackager-and-dvloupe” target= blank”>this MIPoPS blog post</a>.
File List
Here, all of the files you have loaded into dvanalysis are listed. Each file is summarized with basic information such as size, frame count, and first and last timecodes. You can switch between files or remove files from dvanalysis with the X.
Segmenting Rules
Instead of seeing the file list, you can toggle to the Segment tab in the same corner of the interface. This is a section for breaking up a single video into parts based on the presence of specific markers.
- Record start markers: flags indicating the beginning of a recording.
This can be helpful for finding the beginning or end of segments that were recorded separately. It can also help with packaging, if you prefer the segments of content in separate files. Some camcorders use both start and stop markers, but most only use one or the other. - Record stop markers: flags indicating the end of a recording.
This can be helpful for finding the beginning or end of segments that were recorded separately. It can also help with packaging, if you prefer the segments of content in separate files. Some camcorders use both start and stop markers, but most only use one or the other. - Record time break: a break in the recording time for a tape.
This can also help to separate different content into segments. - Timecode break: a break in the timecode for a recording.
Some creators used different timecodes to mark different scenes or portions of content for footage included in a final project. - Audio rate changes: the rate the audio was recorded at changed, either by the frequency, or the number of channels, or both.
Audio rate changes can affect the way players handle the audio. The result might be that audio after a change sounds faster or slower. It might also cause audio to be missing for a portion of the file. Segmenting and packaging by audio rate changes is advised in these cases to ensure accurate playback of the audio for all of the content on a tape. - Aspect ratio changes: the aspect ratio changes from 4/3 to 16/9 (or 16/9 to 4/3).
Similarly to audio rate changes, players cannot always adapt to accommodate both. Segmenting and packaging by aspect ratio changes (or forcing them all to be the same in the packaged file) is advised in these case to ensure accurate playback for both aspect ratios if both were recorded on a single tape.
Select your desired segmenting rules and click “Apply.” If you do not see a separate list of the segments, hover your cursor over the line below the segmenting rules. When an adjustment icon appears, click, hold and drag the border down to reveal the segment list. Check out this example video.
For more information on segments and how they can be useful, please refer to the dvpackager documentation. Also, please see Andrew Weaver’s breakdown of segmentation suggestions.
Analysis Instructions
GUI Analysis
If you just captured a tape, the file will automatically load into the Analysis tab. If you would like to review a different file in dvanalysis, you can either click on the file folder icon with a plus sign, or you can drag a .dv file into the player. dvrescue will then request permission to also write new files to the folder containing your video file.
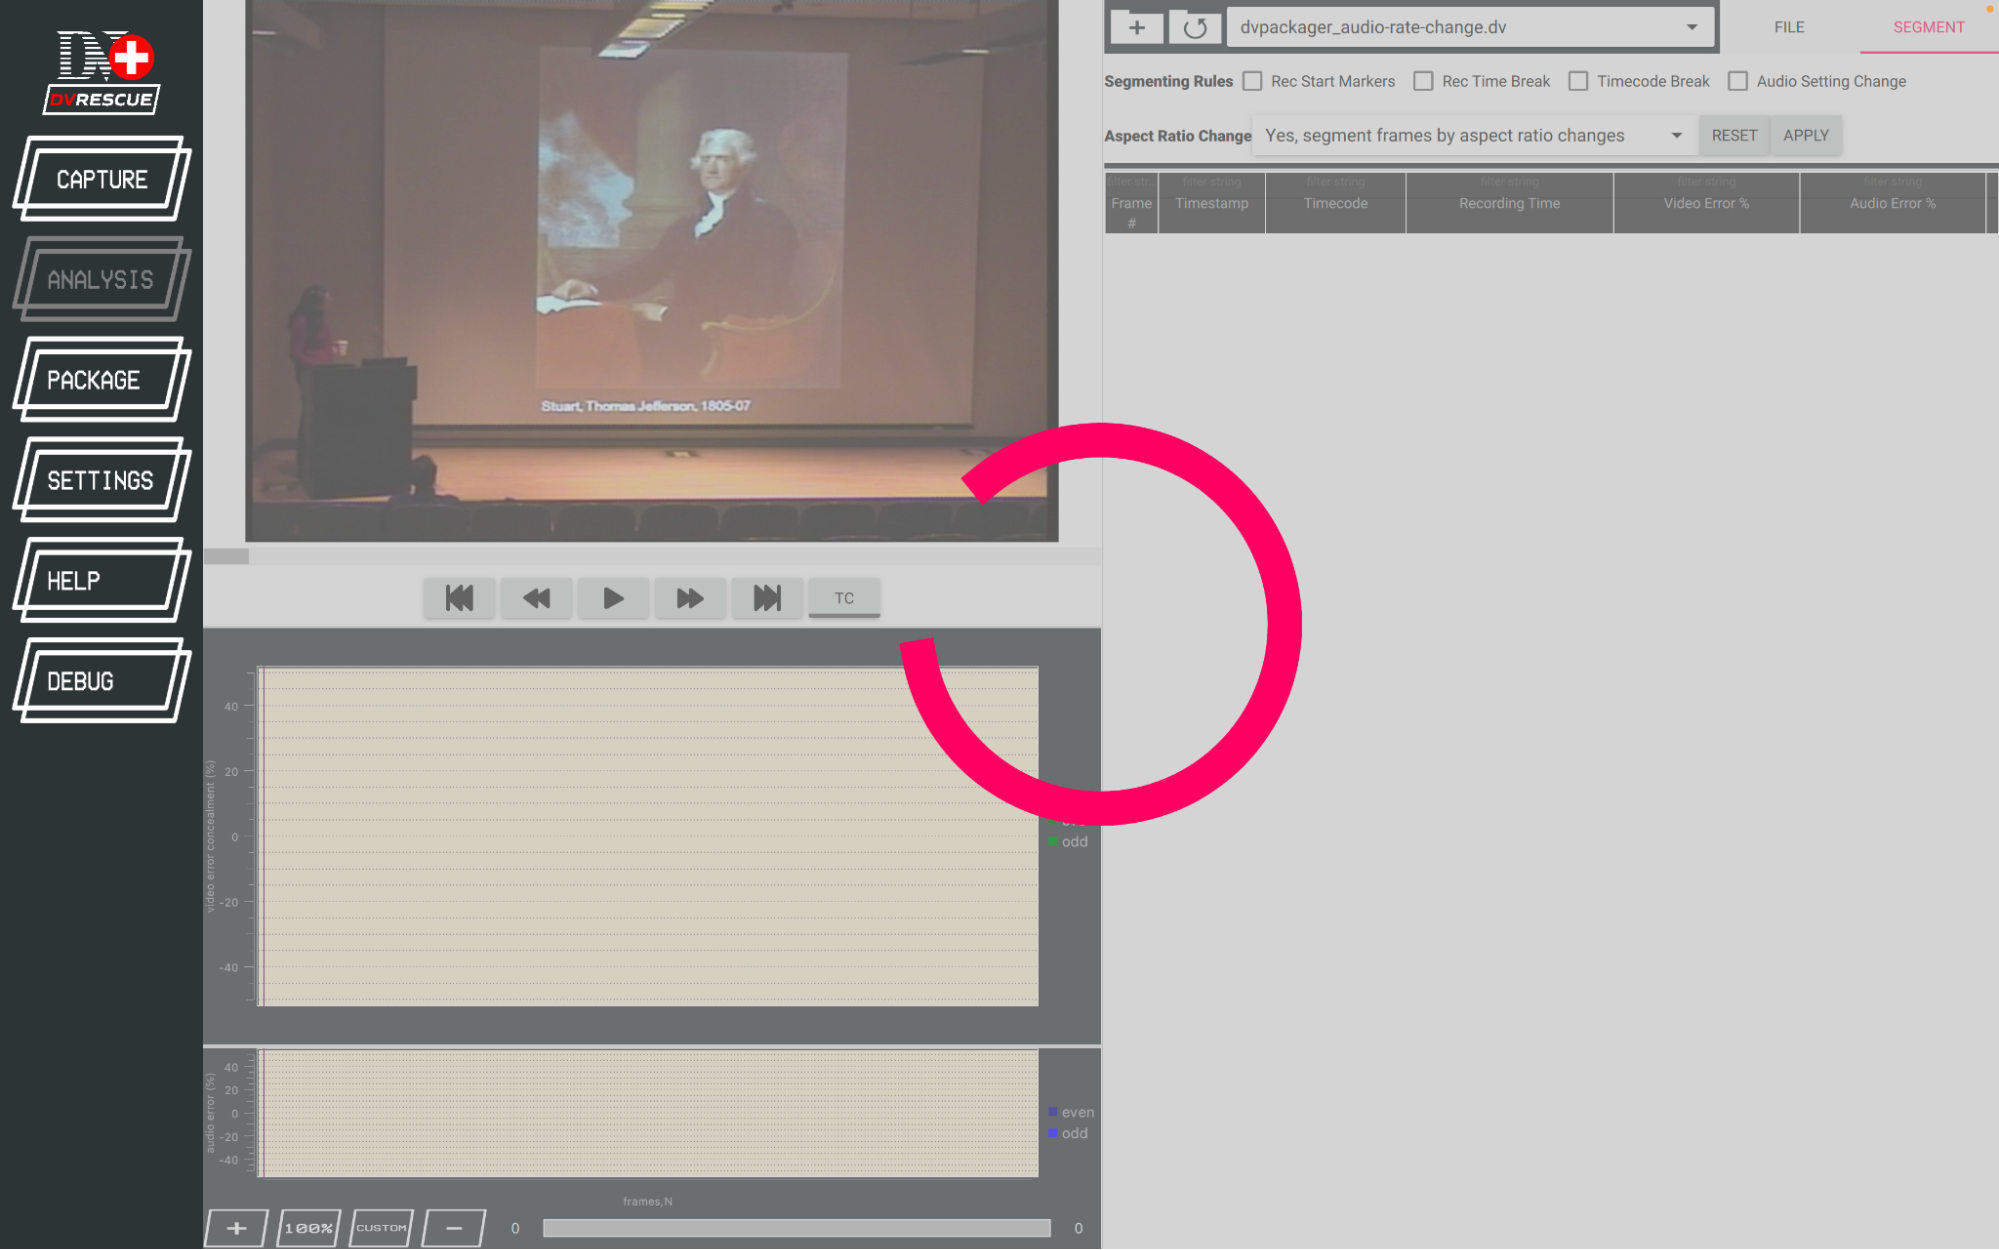
A spinning pink wheel will appear while the file loads. The more errors contained in a video, the longer the files will take to load. Total running time (TRT) and overall file size are also factors, the greatest effect on loading time is the number of errors. The tool is gathering all of the frames that contain errors and generating the table and graphs, so the more errors present, the longer it will take to generate.
Once it is finished, it will also have created an .xml file summarizing the video file and its errors. This will be saved to the folder containing the video file, as well as a sub-folder containing image files for all of the frames that contained errors. Keeping this .xml file will make the process of loading the video into dvanalysis in the future, if necessary, nearly instantaneous.
How to analyze files using the DVRescue CLI
Usage of capture commands
dvplay visually displays and/or generates xml and sidecars of errors in DV file. In visual display, error concealment data in frames will be displayed as yellow.
The basic synxax looks like
dvplay [options] file.dv
To generate a list of options or for additional information, run the following command:
dvplay -h
dvplay flags and options
All of these flags and options can also be viewed by typing dvplay -h into the command line window.
Options:
 -m         (Inverse of standard display)
 -x         (create output xml and jpgs)
 -g         (create gif from error jpgs)
 -o OUTPUT  (select a custom location for output files)

 -O FILE    (provide a path to a single output file. When set a single frame will be exported, depending on
             if -b or -t is set. If 'FILE' is set to '-', dvplay will output a jpeg to stdout.)
 -b OFFSET  (provide a byte offset of the frame to examine, otherwise the first frame is default)
 -t PTS     (provide a timestamp to examine, otherwise the first frame is default. Ignored if '-b OFFSET' is set)

 -h         (Displays this help)
 -B BLOCKS  (draw a box around a specific DIF Block(s). Use a comma-delimited list for more than one,
             such as '-B 0,1348,1349')

 -F <path> (provide a custom ffmpeg path)
 -M <path> (provide a custom mediainfo path)
 -D <path> (provide a custom dvrescue path)
 -X <path> (provide a custom xmlstarlet path)
 -d <path> (provide a custom path to a DVRescue XML that corresponds to the
            input file)

To vizualize the relationship between inputs and a merged output (-s, -S, and -b are required):
 -s <list> (provide a pipe-delimited list of the input files for the merge)
 -S <list> (provide a pipe-delimited list of the offsets to the input files listed in '-s')

 For example 'dvplay -s 'file1.dv|file2.dv' -S '120000|240000' -b 240000 output.dv' would show
 an image that depicts the input frames (at the corresponding offsets of the corresponding input
 file) with the corresponding merged output frame at the corresponding offset.

 -z       (disable colored terminal output)


