dvmerge is part of the dvrescue toolkit. It is used to combine two or more transfers of the same tape into one file, utilizing only error-free frames where it can find them. This reduces the overall number of artifacts in the final file.
How to merge files using the DVRescue GUI
GUI Navigation
GUI Navigation
Input files
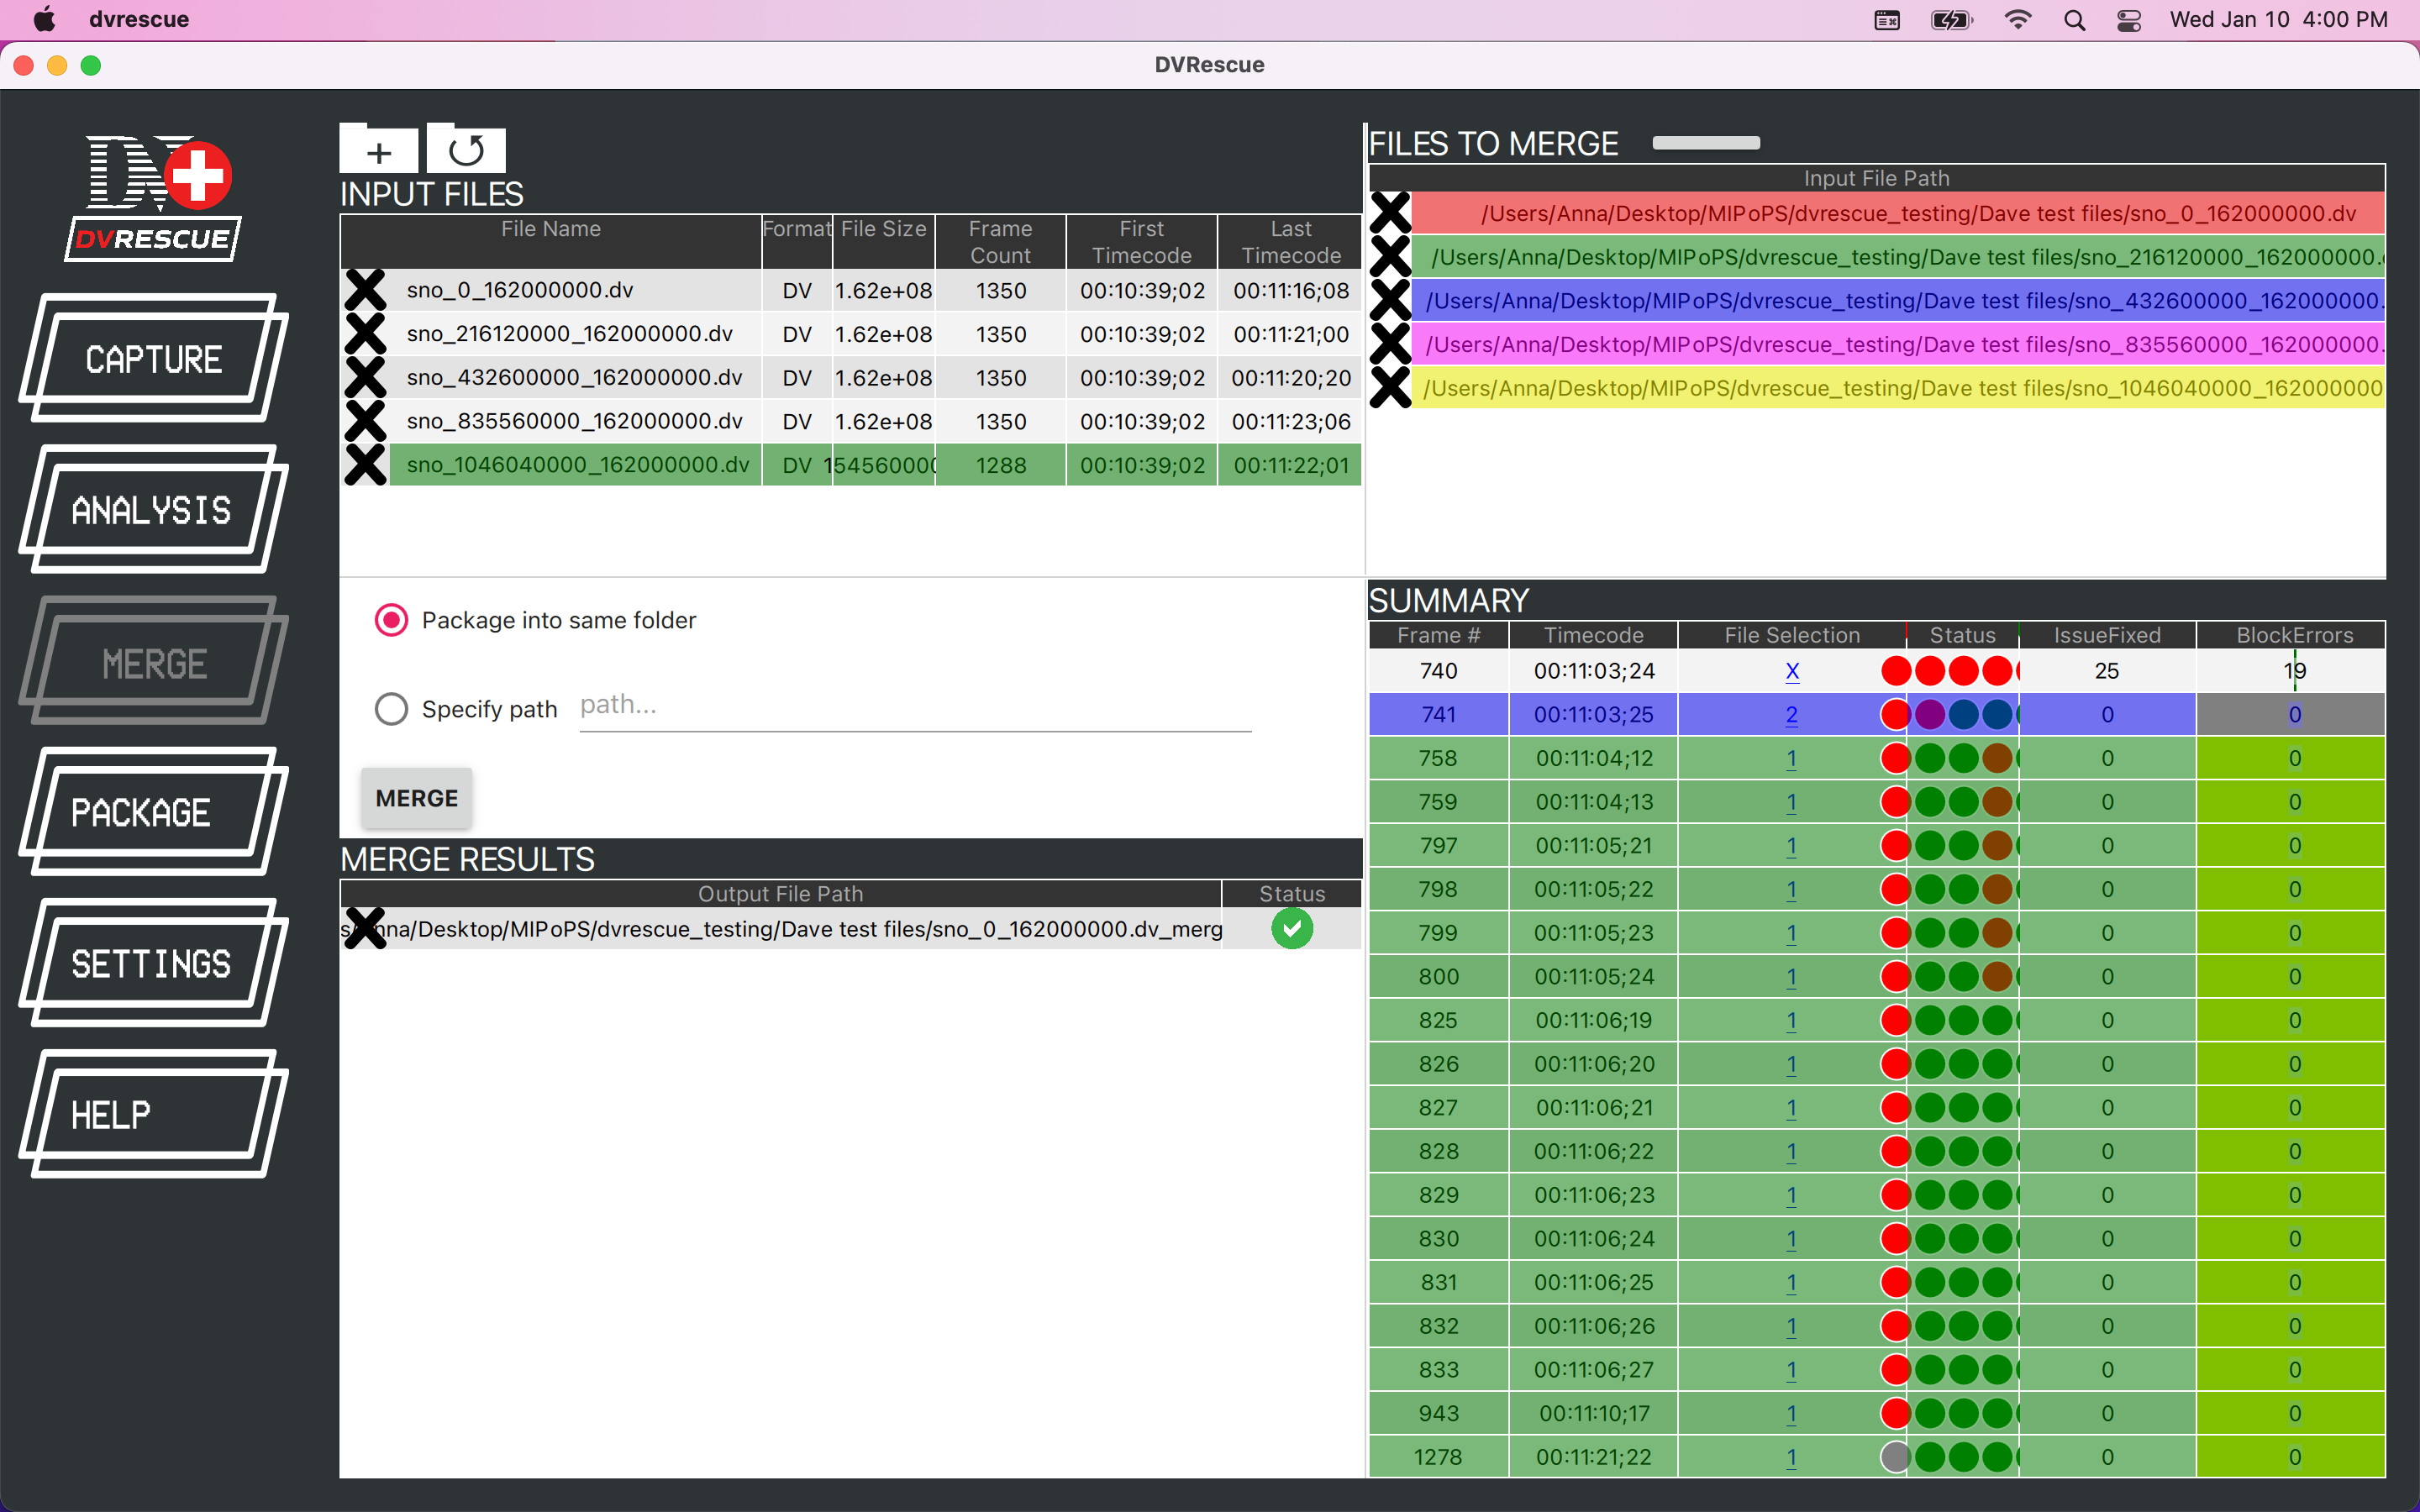
A file list will populate containing any files you have already been working on in other tabs.
- Add files: Files can be added by either clicking the folder with a plus symbol or by dragging and dropping in the files (you can add either DV files or the XML files created during capture or analysis).
- Remove files: You can remove any of these file from the list by clicking on the X.
Files to Merge
Files are added here from the larger file list on the left. Only files that have been added here will be merged. Files listed here are color coordinated to the Summary table below. The first file is the primary, and the rest of the files are used to substitute frames that contain errors in the primary file.
You can also indicate whether you would like the final merged file to be saved in the same directory or elsewhere.
Merge Results Table
This shows all of the merged files that have been created this session. The entire file path is listed as well as an icon that shows its current status.
Summary
This part of the GUI displays the results of a merge by providing a problem frame list and allowing you to investigate them further using a frame comparison viewer (dvloupe) to see how files were merged and which issues were resolved/unresolved.
- Summary: This table provides the results of the merging process by listing every frame that contained errors in the primary file. The color of each frame is coordinated to the file that was used for the frame in question and the problematic blocks are highlighted in the same color.
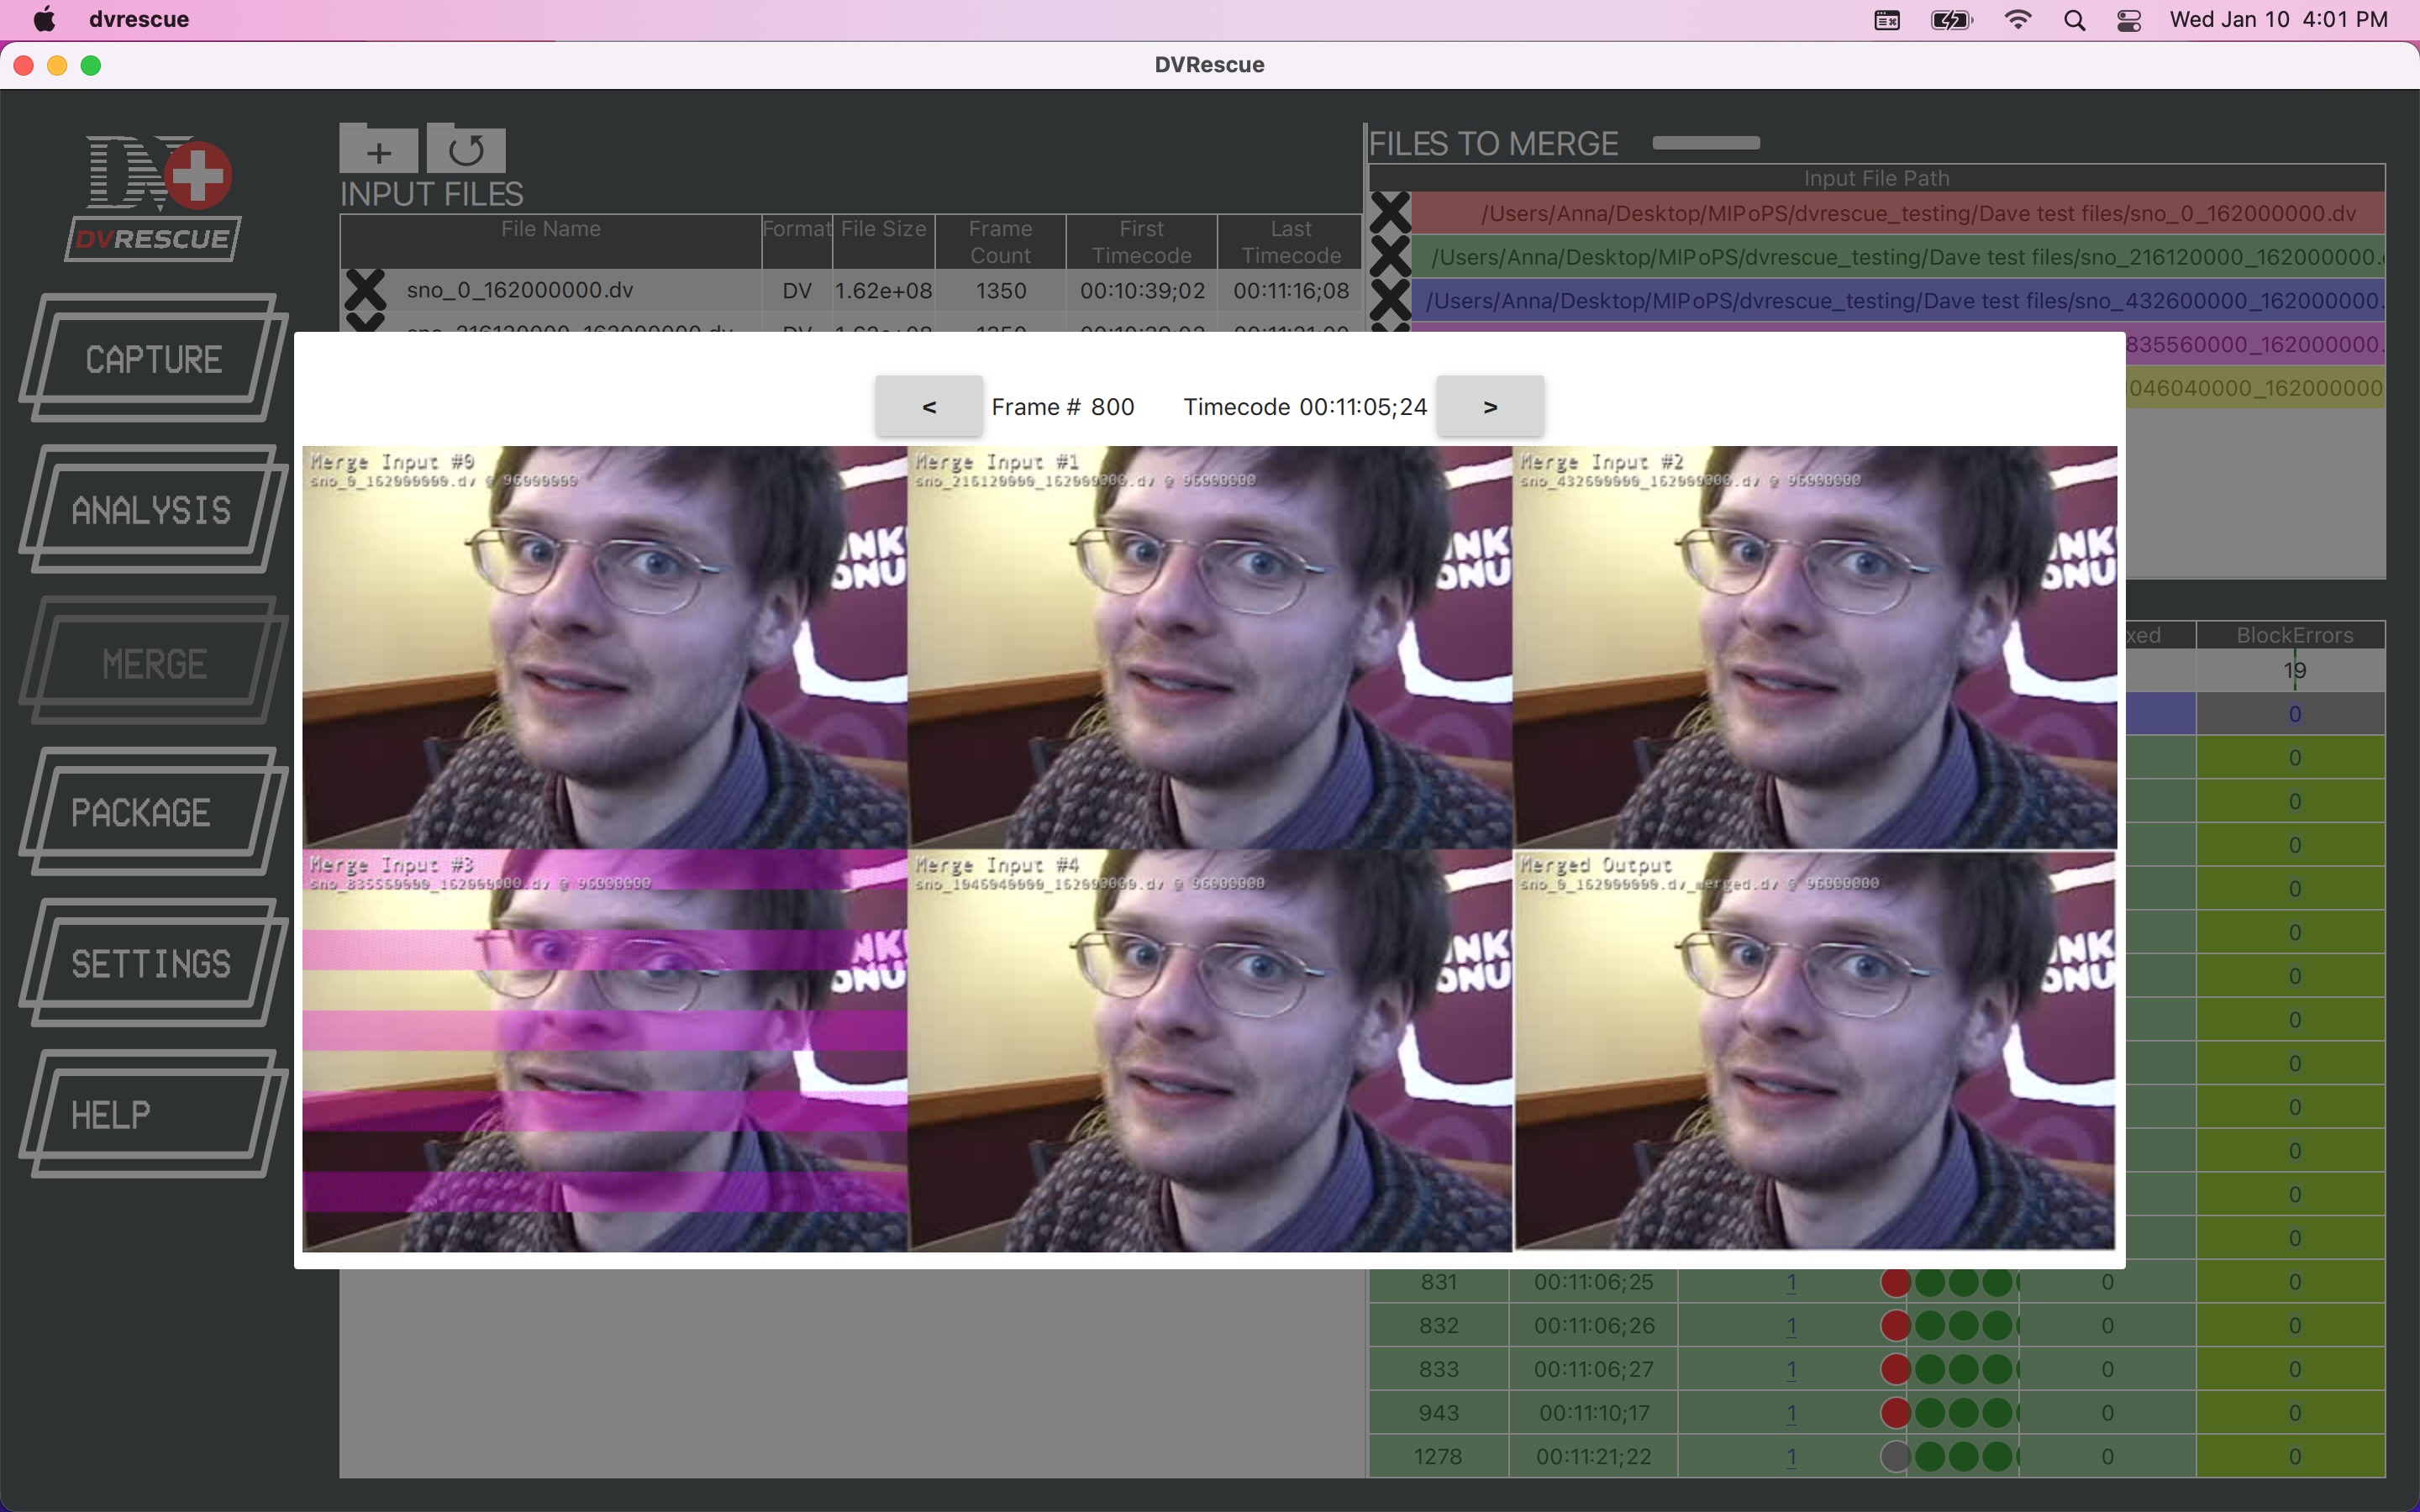
- dvloupe: You can click on the rows to view the merged results in dvloupe. Clicking the file selection number will open a pop-up window that shows you the corresponding frame for every file, with errors highlighted in correspondence with the color code used above. The final image will be what is present in the merged file.
- See the Merge Summary section below for more details.
Merge Instructions
GUI Merge
Additional Captures & Review
- Clean your deck (even if you don’t think it’s a headclog, it might be helpful). If you think the issue originated from a malfunctioning deck, try using another one that is compatible with the tape.
- Please note: merging two files captured from two different decks doesn’t always work properly. It’s advisable to merge files captured from the same deck.
- Using dvcapture (either via vrecord or the DVRescue GUI), capture the tape multiple times. 2-3 times is advised to create an initial assessment of the problem spots in the tape.
- If you are unsure if the errors occurred in the same blocks, you can skip to Step 4 to compare the first two captures before deciding to create additional ones for a merge.
- Make sure that you modify the identifier so that you know that the files are various captures of the same tape and don’t accidentally overwrite the original or delete it. For example, if the original identifier is “1234.dv” you could add a suffix to the first captured file, (such as “pass-01”). Use this suffix for each subsequent capture (“1234_pass-02, 1234_pass-03, etc.)
- Compare the files in the Anaylsis tab. From the list of problematic frames generated by each file, scan to see if there are any of the same frame numbers across the list. Please see the Analyze documentation for details on how to assess the two files.
Merging
- In the DVRescue GUI, navigate to the Merge tab from the menu on the left side.
- Under Input Files, a file list will populate containing any files you have already been working on in other tabs. You can remove any of these with the X next to the file name and you can import other files by clicking the folder icon with a plus symbol or by dragging and dropping the files into the window. Add all of the transfers you made for the single tape.
- Click and drag all files you want to merge to the Files to Merge box. The first one you add will be the primary file.
- There is no current limit on the number of files that can be merged, but it is not usually worthwhile to merge more than four or five files, as this is sufficient to eliminate virtually all transient artifacts.
- Select the radio button indicating if you would like the merged output file to save to the same folder or a different location. The default is to save the merged file into the same directory. If you want to select a different location, follow the instructions below:
- Click the three dots next to the Specify path field.
- From the pop-up window that appears, navigate to the location where you want the file to be saved. You can create a new folder if needed.
- Enter a file name. Make sure it is unique to the original ID so it doesn’t get confused with the original or accidentally overridden.
- Click Save.
- Once you are certain you are ready, click the Merge button to begin the merge process.
- Wait for the Merge Results window to show that your file is finished. Time for completion varies depending on the length of the recording, the number of files being used in the merge, your computer and the number of problem frames in the file.
- You may review the results in the Summary window or open the merged file to watch it in your preferred playback software.
Merge Summary Review
- The summary window displays both an overall summary of the merging process and a table of problematic frames that were merged, including which files blocks and full frames were selected from.
- The summary overview provides a comparison between the original file (the first one that was added to the merge) and the merged file. Comparison details include missing frames, bad blocks, and the usage of each file included in the merge.
- The table in the summary window provides the results of the merging process by listing every frame that contained errors in the primary file. The color of each frame is coordinated to the file that was used for the frame in question and the problematic blocks are highlighted in the same color. You can click on the rows to view the merged results in dvloupe.
- File Selection tells you which file it eventually chose the frame from. An X means that no file had a perfect version of that frame, so dvmerge had to use parts of multiple files to piece together an error-reduced frame.
- Status reports the status of the frame in every file that was provided. A red light means the frame had a problem in that file, a green light means it was a good frame, and a gray light means the frame was entirely missing from that file.
- Clicking the file selection number will open a pop-up window that shows you the corresponding frame for every file, with errors highlighted in correspondence with the color code used above. The final image will be what is present in the merged file.
- Examples of common types of merging results:
1. resolved headclog - it is not uncommon for a headclog to temporarily develop due to shedding, especially when you are running multiple passes. In this example the displayed frame was fine for captures (input files) #1, #2, #4 and #5, but there was a headclog blocking the frame for #3. Since the merge software reviews each from in the order of the input files, the frame from #1 was selected. If input file #3 had been added first, dvmerge would have checked that frame in the next input file, and would have selected it because it doesn’t contain errors.
2. single good frame selected from a single file
3. blocks used from various various files to create a single complete frame
4. reduction of bad blocks (but still contains missing blocks or bad blocks)
5. missing frames
6. frames with the exact same errors for various captures (a result of tape damage/breakdown)
Command line interface
Usage of merge commands
- In your command line interface, type the following command
dvrescue --v 9 [pathtofile/file-pass-1.dv] [pathtofile/file-pass-2.dv] [pathtofile/file-pass-3.dv] --merge [pathtofile/file-merged.dv] - Insert the full file path of each file you want to merge. The first one you add will be the primary file.
- There is no current limit on the number of files that can be merged, but it is not usually worthwhile to merge more than four or five files, as this is sufficient to eliminate virtually all transient artifacts.
- Designate the name and file path of the merged file which will be output at the end. Here is an example of input for merging:
- While it’s running, depending on the verbosity level selected, you will see one of the following in the Terminal:
- When it’s finished, you may want to save the terminal output as file_merge-log.txt so it can be retained as metadata on the final file.
Flags and options
All of these options can also be viewed by typing dvrescue -h into the command line window.
--m [value]                   Merge all input files into value (file name), picking the best part of each file.
--merge-log value             Store merge log to value (file name).
--merge-output-speed          Report and merge frames having speed not meaning normal playback
                                  Is default (it will change in the future).
--merge-ignore-speed          Do not report and do not merge frames having speed not meaning normal playback.
--merge-output-concealed      Report and merge frames having all blocks concealed.
                                  Is default (it will change in the future).
--merge-ignore-concealed      Do not report and do not merge frames having all blocks concealed.
--merge-log-missing           Report frames considered as missing (due to time code jump etc).
                                  Is default if information output format is not CSV.
--merge-hide-missing          Do not report frames considered as missing (due to time code jump etc).
                                  Is default if information output format is CSV.
--merge-log-intermediate      Display additional lines of information about intermediate analysis during files merge.
                                  Is default if information output format is not CSV.
--merge-hide-intermediate     Hide additional lines of information about intermediate analysis during files merge.
                                  Is default if information output format is CSV.
--verbosity value | -v value  This is the level of detail that you would like the Terminal to provide during and after the merging process.
                              The amount of information provided varies from 0 (no information is provided during merging besides a frame count
                              of the current processing location) to 9 (information on what frames and blocks are being selected is displayed
                              for every single frame included in the merge (problematic, as well as frames that are fine).  on the way that
                              Verbosity of the output set to value:
                                  0: no output, no summary is provided
                                  5: summary only.
                                  7: information per problematic frame + a summary of the merging process.
                                  9: information per frame + summary.


