

If you run into bugs or other trouble while using DVRescue, check whether your issue matches any of the common issues below and follow the troubleshooting steps.
When troubleshooting any issue, ensure that you are using the most current version of DVRescue, which you can download here.
Don’t see your issue anywhere?
Read below about how to use GitHub to search and report new issues.
Guide
The GitHub issues page is where you can report, discuss, and resolve problems you are experiencing with DVRescue.
Search for a few keywords to see whether your issue, or something similar, has been reported already. You can contribute to that existing discussion if desired, or follow any steps currently being developed to fix the problem.
To report a new issue, first do the following:
- Make sure you are using the most current version of DVRescue. Open the program and select “about DVRescue” in the top left menu. Make a note of the version date.
- Also make a note of your machine and OS version under “About this Mac”
- Open the Terminal.app and launch DVRescue by running this command:
/Applications/dvrescue.app/Contents/MacOS/dvrescue --log - Recreate the issue using the fewest number of steps possible
- Quit DVRescue
- Go back to Terminal and run this command:
cat ~/Library/Containers/net.MediaArea.dvrescue.mac-gui/Data/dvrescue-gui_logs/dvrescue-gui.log - Either copy the contents or go to
Shell -> Export Text Asto save as a text document - In GitHub, you will need to be logged into your account. Select the “New issue” button and give your issue a succinct and specific title
- Describe your issue as clearly as you can. Attach or copy-paste the log you just saved. Make sure to specify your computer, its OS, and the version of DVRescue
You should be automatically subscribed to receive notifications when others reply or add to your issue. Keep an eye on it because the developers may ask follow up questions, ask you to try to replicate your issue with different steps, or ask you whether new DVRescue updates have fixed the issue.
Known Issues
Below is a list of known issues for the recent builds of DVRescue. Please see the linked issues on GitHub for more details.
- Windows/Linux connection with adapters doesn’t work (Issue 1, Issue 2)
- Deck control in the DVRescue GUI is buggy
- DVCPRO will not capture via dvrescue GUI, CLI or vrecord
- DVRescue crashing when merging files
- DVpackager Rewrapped MOV Files Broken Header
No DV Deck Detected
Guide

If your deck does not show up, try the following troubleshooting. There is also a video guide related to this troubleshooting.
Before troubleshooting, ensure that your permissions are allowing dvrescue to connect to DV decks and record your screen. Refer to the section below.
After every step, re-launch DVRescue and check the capture tab to see if the device is detected. Restarting your computer and deck after major changes is also helpful.
Check Connections
Start by ensuring that none of your cables are bent at a hard angle or straining to reach either the deck or the computer, and that all are properly supported. All three of these factors can cause cable failure.
As noted in the Hardware Setup guide, make sure that the port and cable you are using both have the Thunderbolt symbol. For some Mac laptops, the symbols are not included above the ports, but you can check the specifics by reviewing the Apple Port Guide.
Turn it On and Off Again!
The most time-honored of troubleshooting tactics.
Restart DVRescue and the deck.
- It can be helpful to do this a few times, changing the order of things slightly. For example, try turning the deck on before or after opening DVRescue.
- Always pause for a moment before turning the deck back on.
- Always wait at least a minute after closing DVRescue before opening it again.
- It can take DVRescue a few minutes to connect to the deck if you’re using a new daily build or release, or if it’s the first time you’ve opened DVRescue.
If it is still not detected, restart your computer.
- Turn the deck off and close out of DVRescue
- Reboot the computer
- Once the computer reboots, turn the deck back on.
- Wait a few minutes and then open DVRescue again to check if it is connected.
If you’re still not connected to the deck, move onto further troubleshooting steps for your system.
macOS Steps
Check for the Device in the Command Line
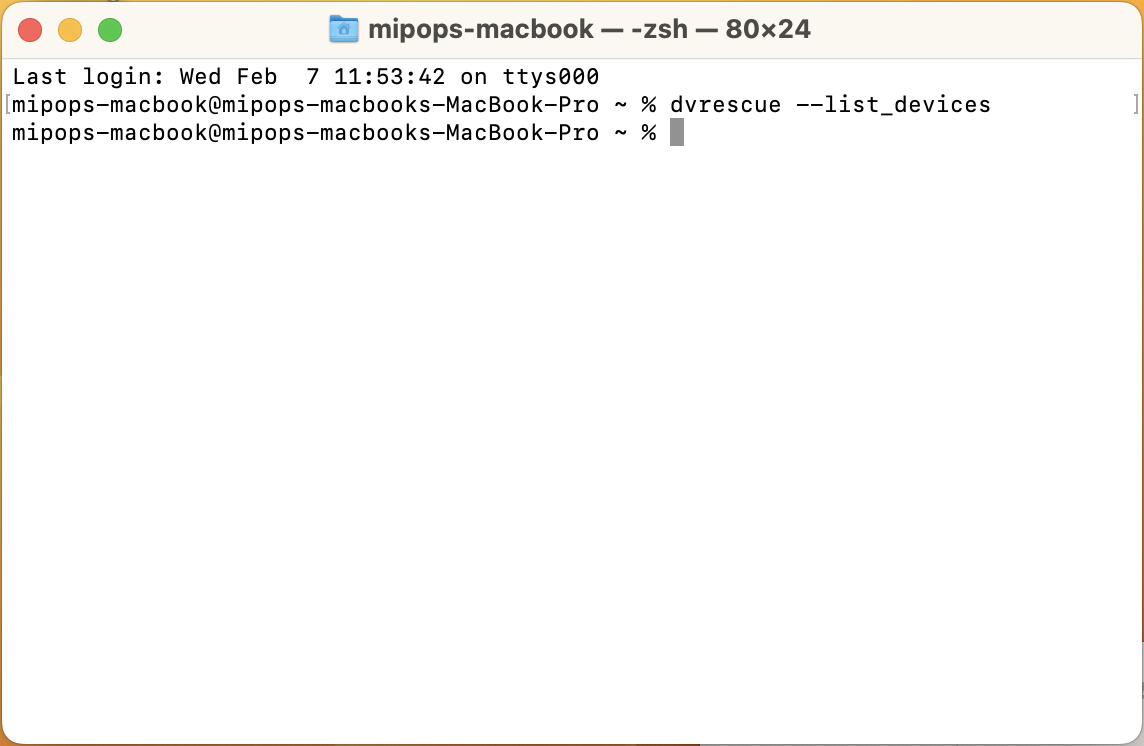
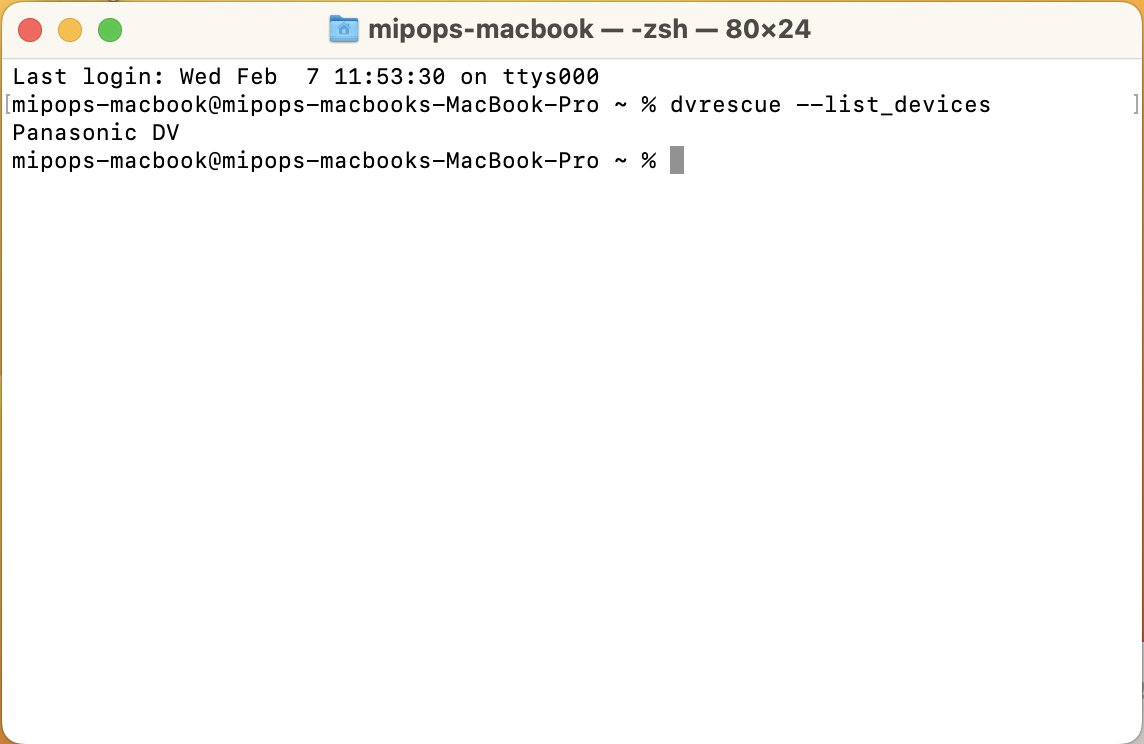
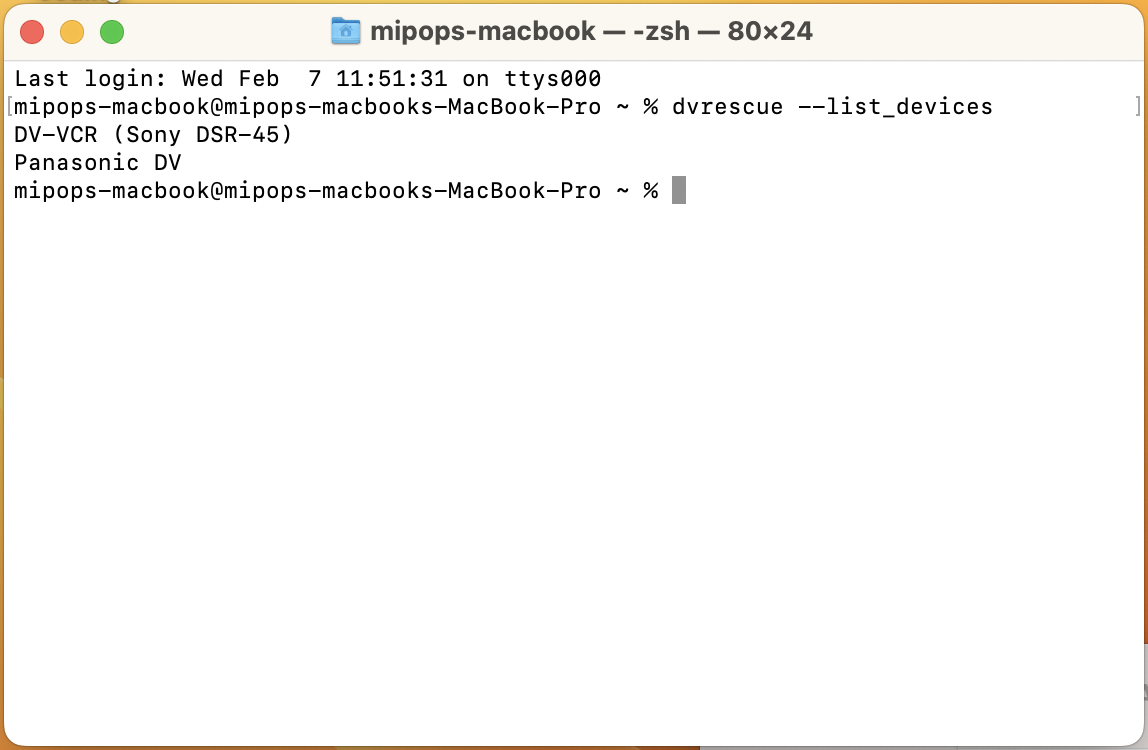
Check whether the deck is detected through the command line by opening Terminal and running dvrescue --list_devices
This is more comprehensive and accurate than what is displayed in the GUI. If your deck is listed, then DVRescue is connected to it. Restart the DVRescue GUI and wait a few minutes to see if it shows up.
 |
 |
 |
If your deck is not detected in the list of devices, next check whether it’s detected by other programs.
Check for Device in Other Programs
This helps to know if the issue is with the connection between your computer and the deck or with only DVRescue.
vrecord
- In the Terminal, run
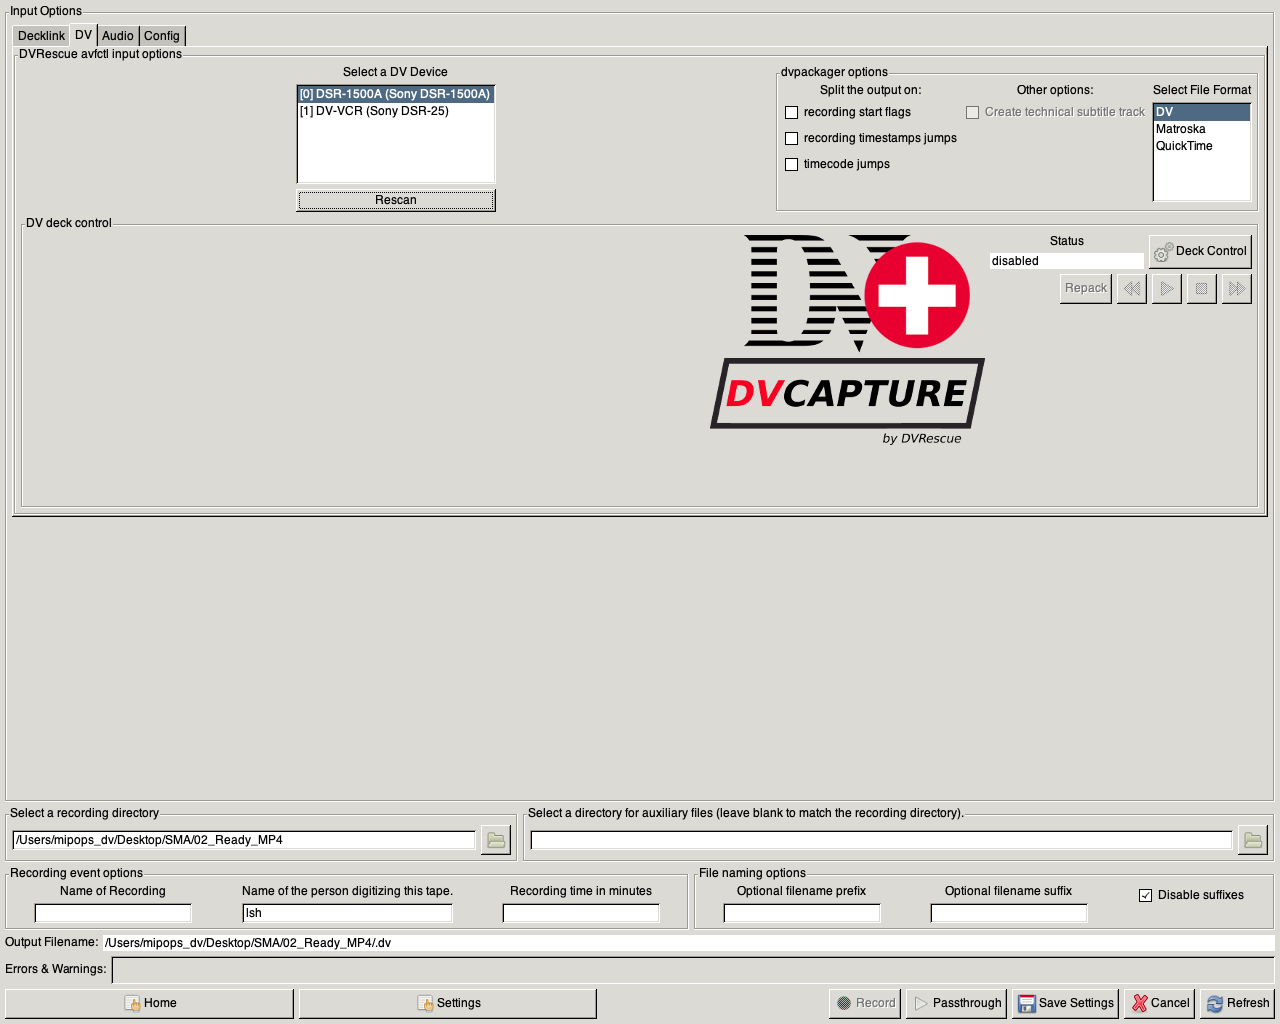
vrecord -e - Select the “DV” tab
- The device should appear in the list under the “Select a DV Device” section at the top of the window.
- If the device does not click the “Rescan” button (located below the list of the devices).
- If this doesn’t work, try waiting a few minutes and click “Rescan” again. It can sometimes take a few times before vrecord recognizes the device.
QuickTime
- Open Quicktime
- In the File menu, select “New Movie Recording”
- In the viewer that opens, click on the arrow next to the red record button.
- See if your device is listed in the menu that opens.
If vrecord and/or QuickTime can detect the deck, then you do have a connection. Return to DVRescue and again try restarting and waiting. Consider uninstalling and reinstalling DVRescue, using the most up-to-date version.
If the device does not show up in QuickTime or vrecord either, move on to check to see if the device is detected by your computer at all.
Verify Firewire Connection
There are two ways you can access the list of connected devices to see if the FireWire connection is working at all.
Terminal
- Open the Terminal
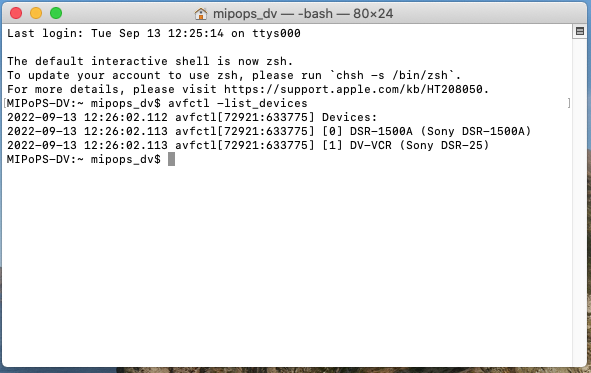
- Run
avfctl -list_devices - This should generate a list of devices connected to your computer via FireWire.
Alternatively, you can run ioreg -l which will generate a list of all of the devices connected to your computer through various means. This list will be longer, but very comprehensive.
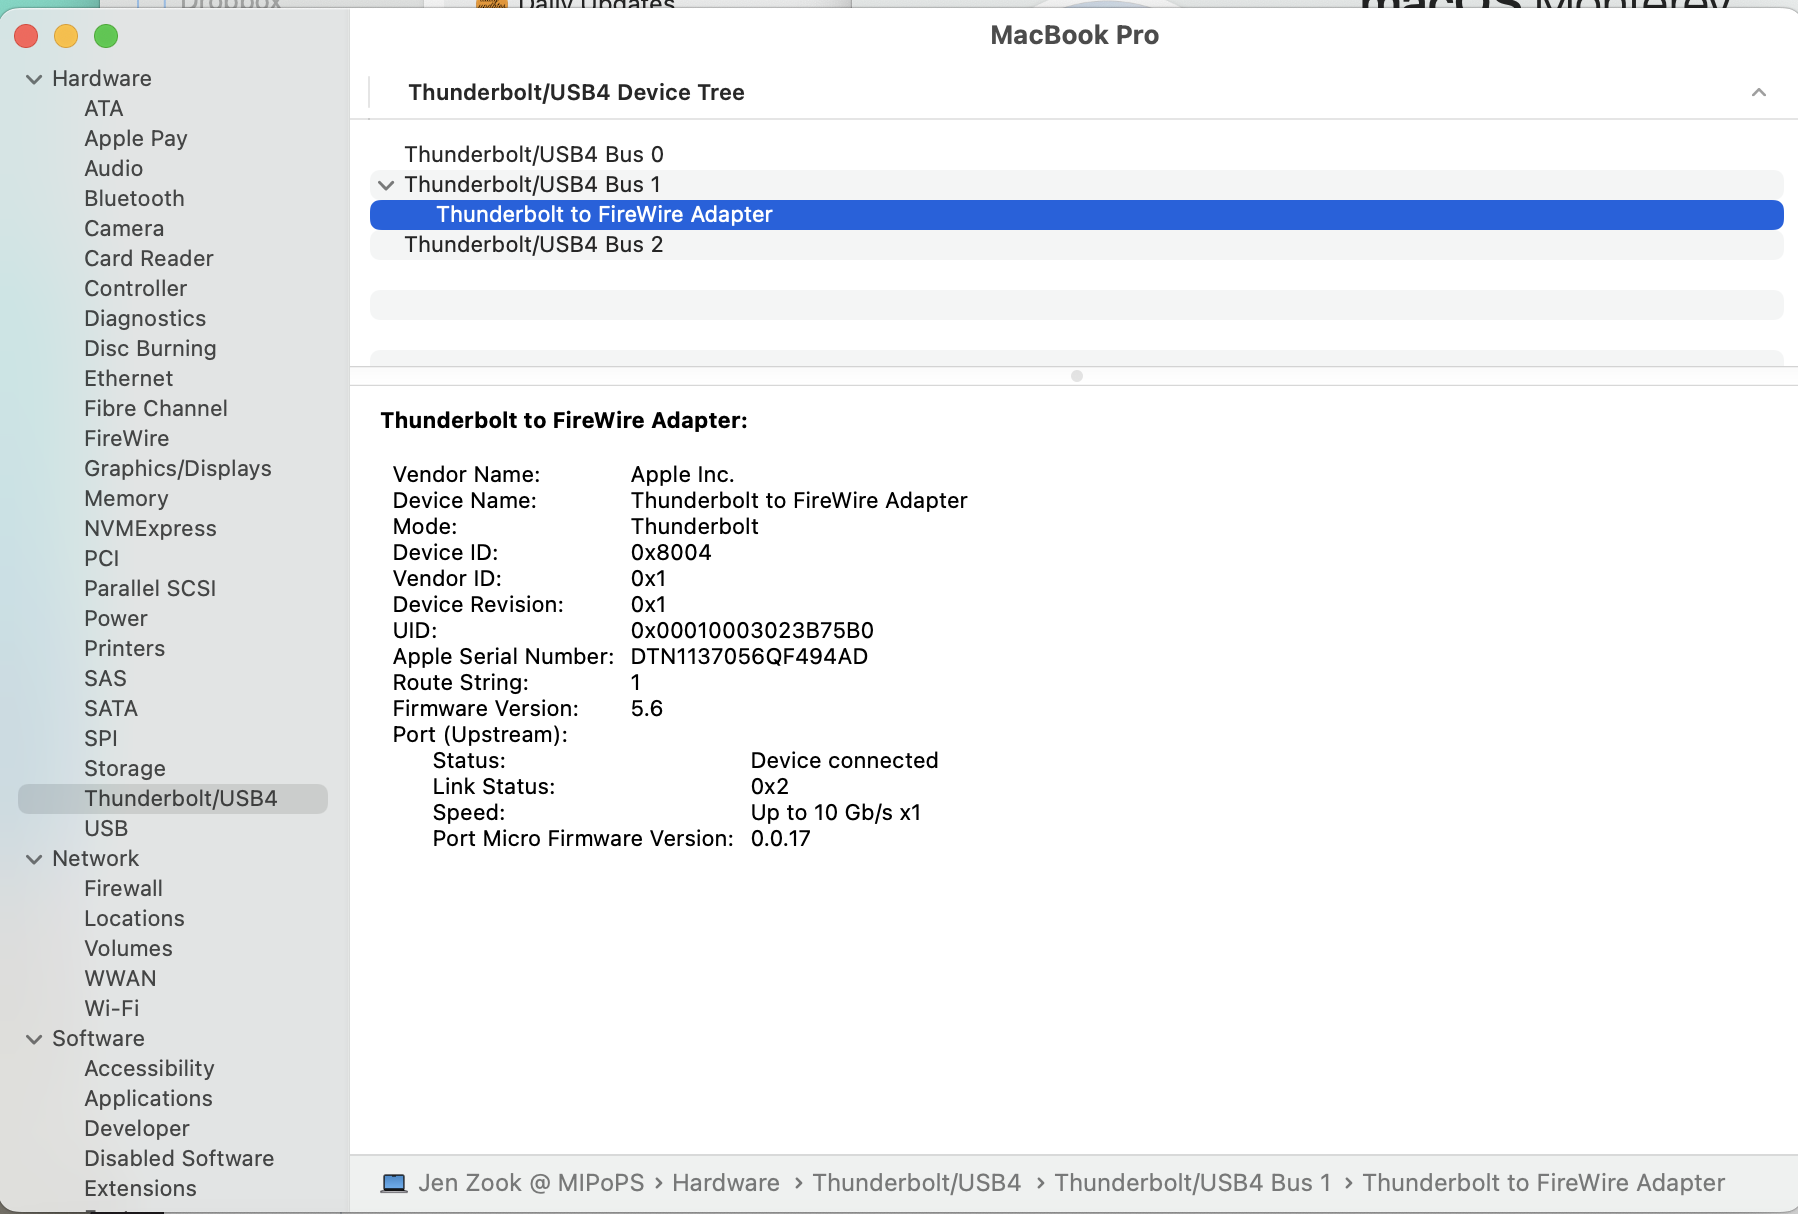
System Settings
- Go to About This Mac -> System Report
- Scroll down to Hardware/Thunderbolt
- The device(s) should be listed in the connected ports with the note “Device Connected”
If the device is not detected in hardware, refer to the Failed Component section.
If the device is detected in hardware, but you are unable to establish a connection via vrecord, DVRescue or QuickTime, try the following steps to confirm your permissions and security policy are setup to be compatible with dvrescue.
Check for Issues with BlackMagic
If all of the previous steps have failed, there may be an issue with your Blackmagic drivers. Even though you only directly use a BlackMagic video card for analog videotape captures, it is still required to run vrecord and dvrescue in general.
Check for Device in BlackMagic Media Express
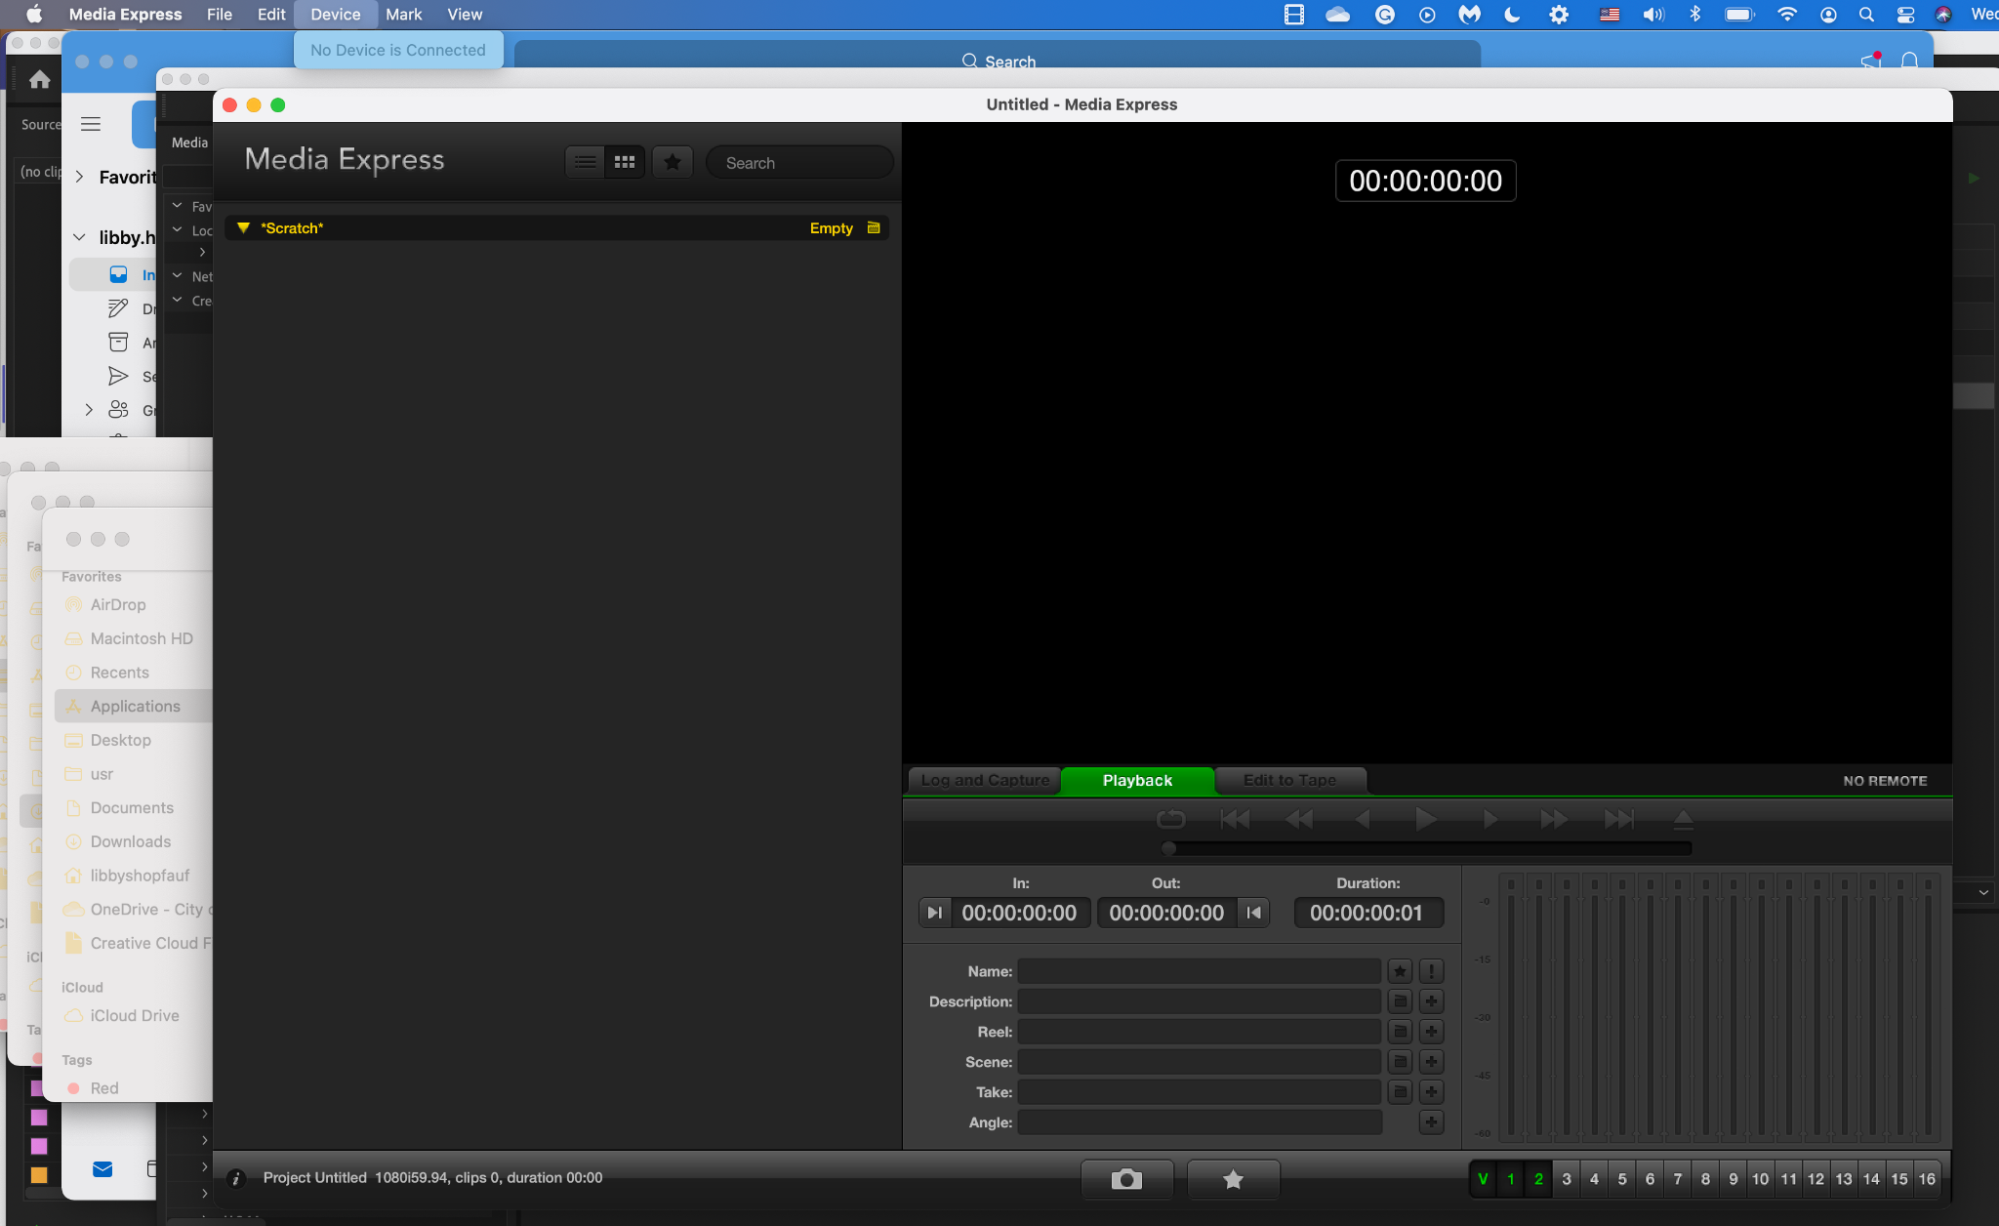
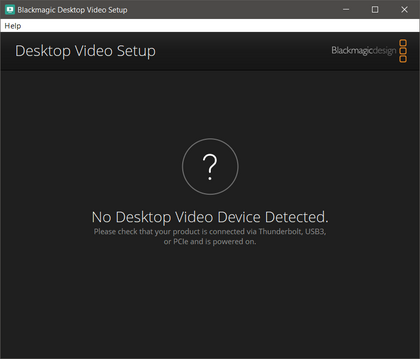
First check BlackMagic as well. Open BlackMagic Media Express. In the menu, choose Device. If it says “No device is connected” then this is further confirmation of the issue.
Reinstall BlackMagic Drivers
Before reinstalling BlackMagic drivers, double check the vrecord GitHub page, including the current issues, for conflicts with particular versions of BlackMagic. It is not always compatible with the current release of vrecord and can cause issues.
If there are no logged issues, then follow the next steps.
- Try a fresh install of BlackMagic Design drivers. If drivers are already installed, uninstall them using the uninstall command in the Blackmagic system folder.
- Download and install the drivers. The latest versions of BM software tend to be buggy, so just go with the oldest version of the drivers that your macOS can work with.
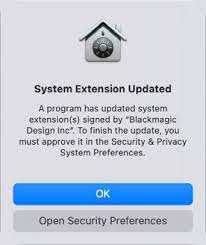
- During the installation process, you should be prompted to allow Apple to use 3rd party extensions. Click “Open Security Preferences”
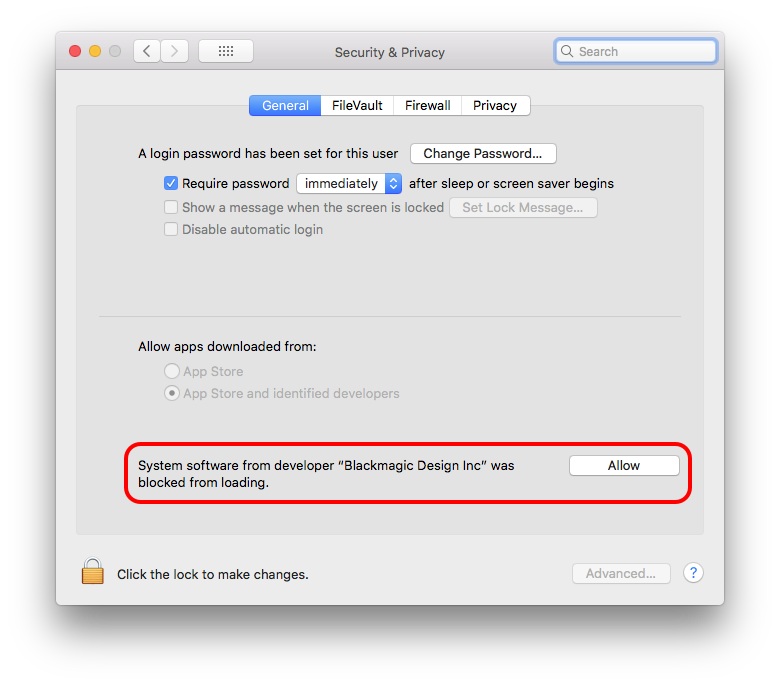
- System Preferences will open a new window with your Security Preferences. Click on the General tab.
- If it’s not already unlocked, click on the lock icon in the lower left hand corner of the window. Enter your password when prompted.
- Click “Allow” near the bottom of the window.
- Make sure to relock the lock to save the changes you have made to your Security Preferences.
- Shut down your computer (don’t restart if prompted).
Windows/Linux/Ubuntu Steps
Note that capture is not supported at this time in the GUI on windows/Linux/Ubuntu. In order to capture on Windows, you will need a dual boot of Windows/Ubuntu and you will need to use the CLI or dvcapture via vrecord.
Check for your device in the command line with dvrescue --list_devices and in vrecord with vrecord -e, selecting the “DV” tab. If the device is detected there, you should be able to capture.
Some versions of Ubuntu might need permissions to be edited to allow DVRescue access. See this issue on the project page for more details. A possible solution is outlined below.
At this time, DVRescue offers limited support for non-OSX systems, although we hope to expand in the future. If you are using Windows, Linux, or Ubuntu and DVRescue still isn’t able to interact with your DV deck, or if you have any other trouble with the software, you may need to do some research in order to troubleshoot. You can start by perusing the GitHub Issues page for any discussions that might relate to your issue. Search “windows,” “ubuntu” or other keywords as appropriate to locate relevate issues.
Failed Component
If the deck is not detected in your computer’s FireWire connections even after you have checked your cables, restarted your computer and deck, and followed all other troubleshooting above, then it is likely that one of the physical components of your connection has failed.
Try using a different deck, cable, or adapter, making sure to change only one variable at a time in order to hone in on the part that is not working. The most common issue would be a failed cord or adapter. Unfortunately, Apple adapters seem to have a longer lifespan than other brands at this time. For a step-by-step guide to ensure you determine the correct variable, see the following section.
For most of these tips, the assumption is that you have additional cables, adapters and FireWire devices. It is our recommendation that when you purchase a cable or adapter that you buy at least two (or more) at a time to ensure that you have a replacement for testing and in the event of cable failure.
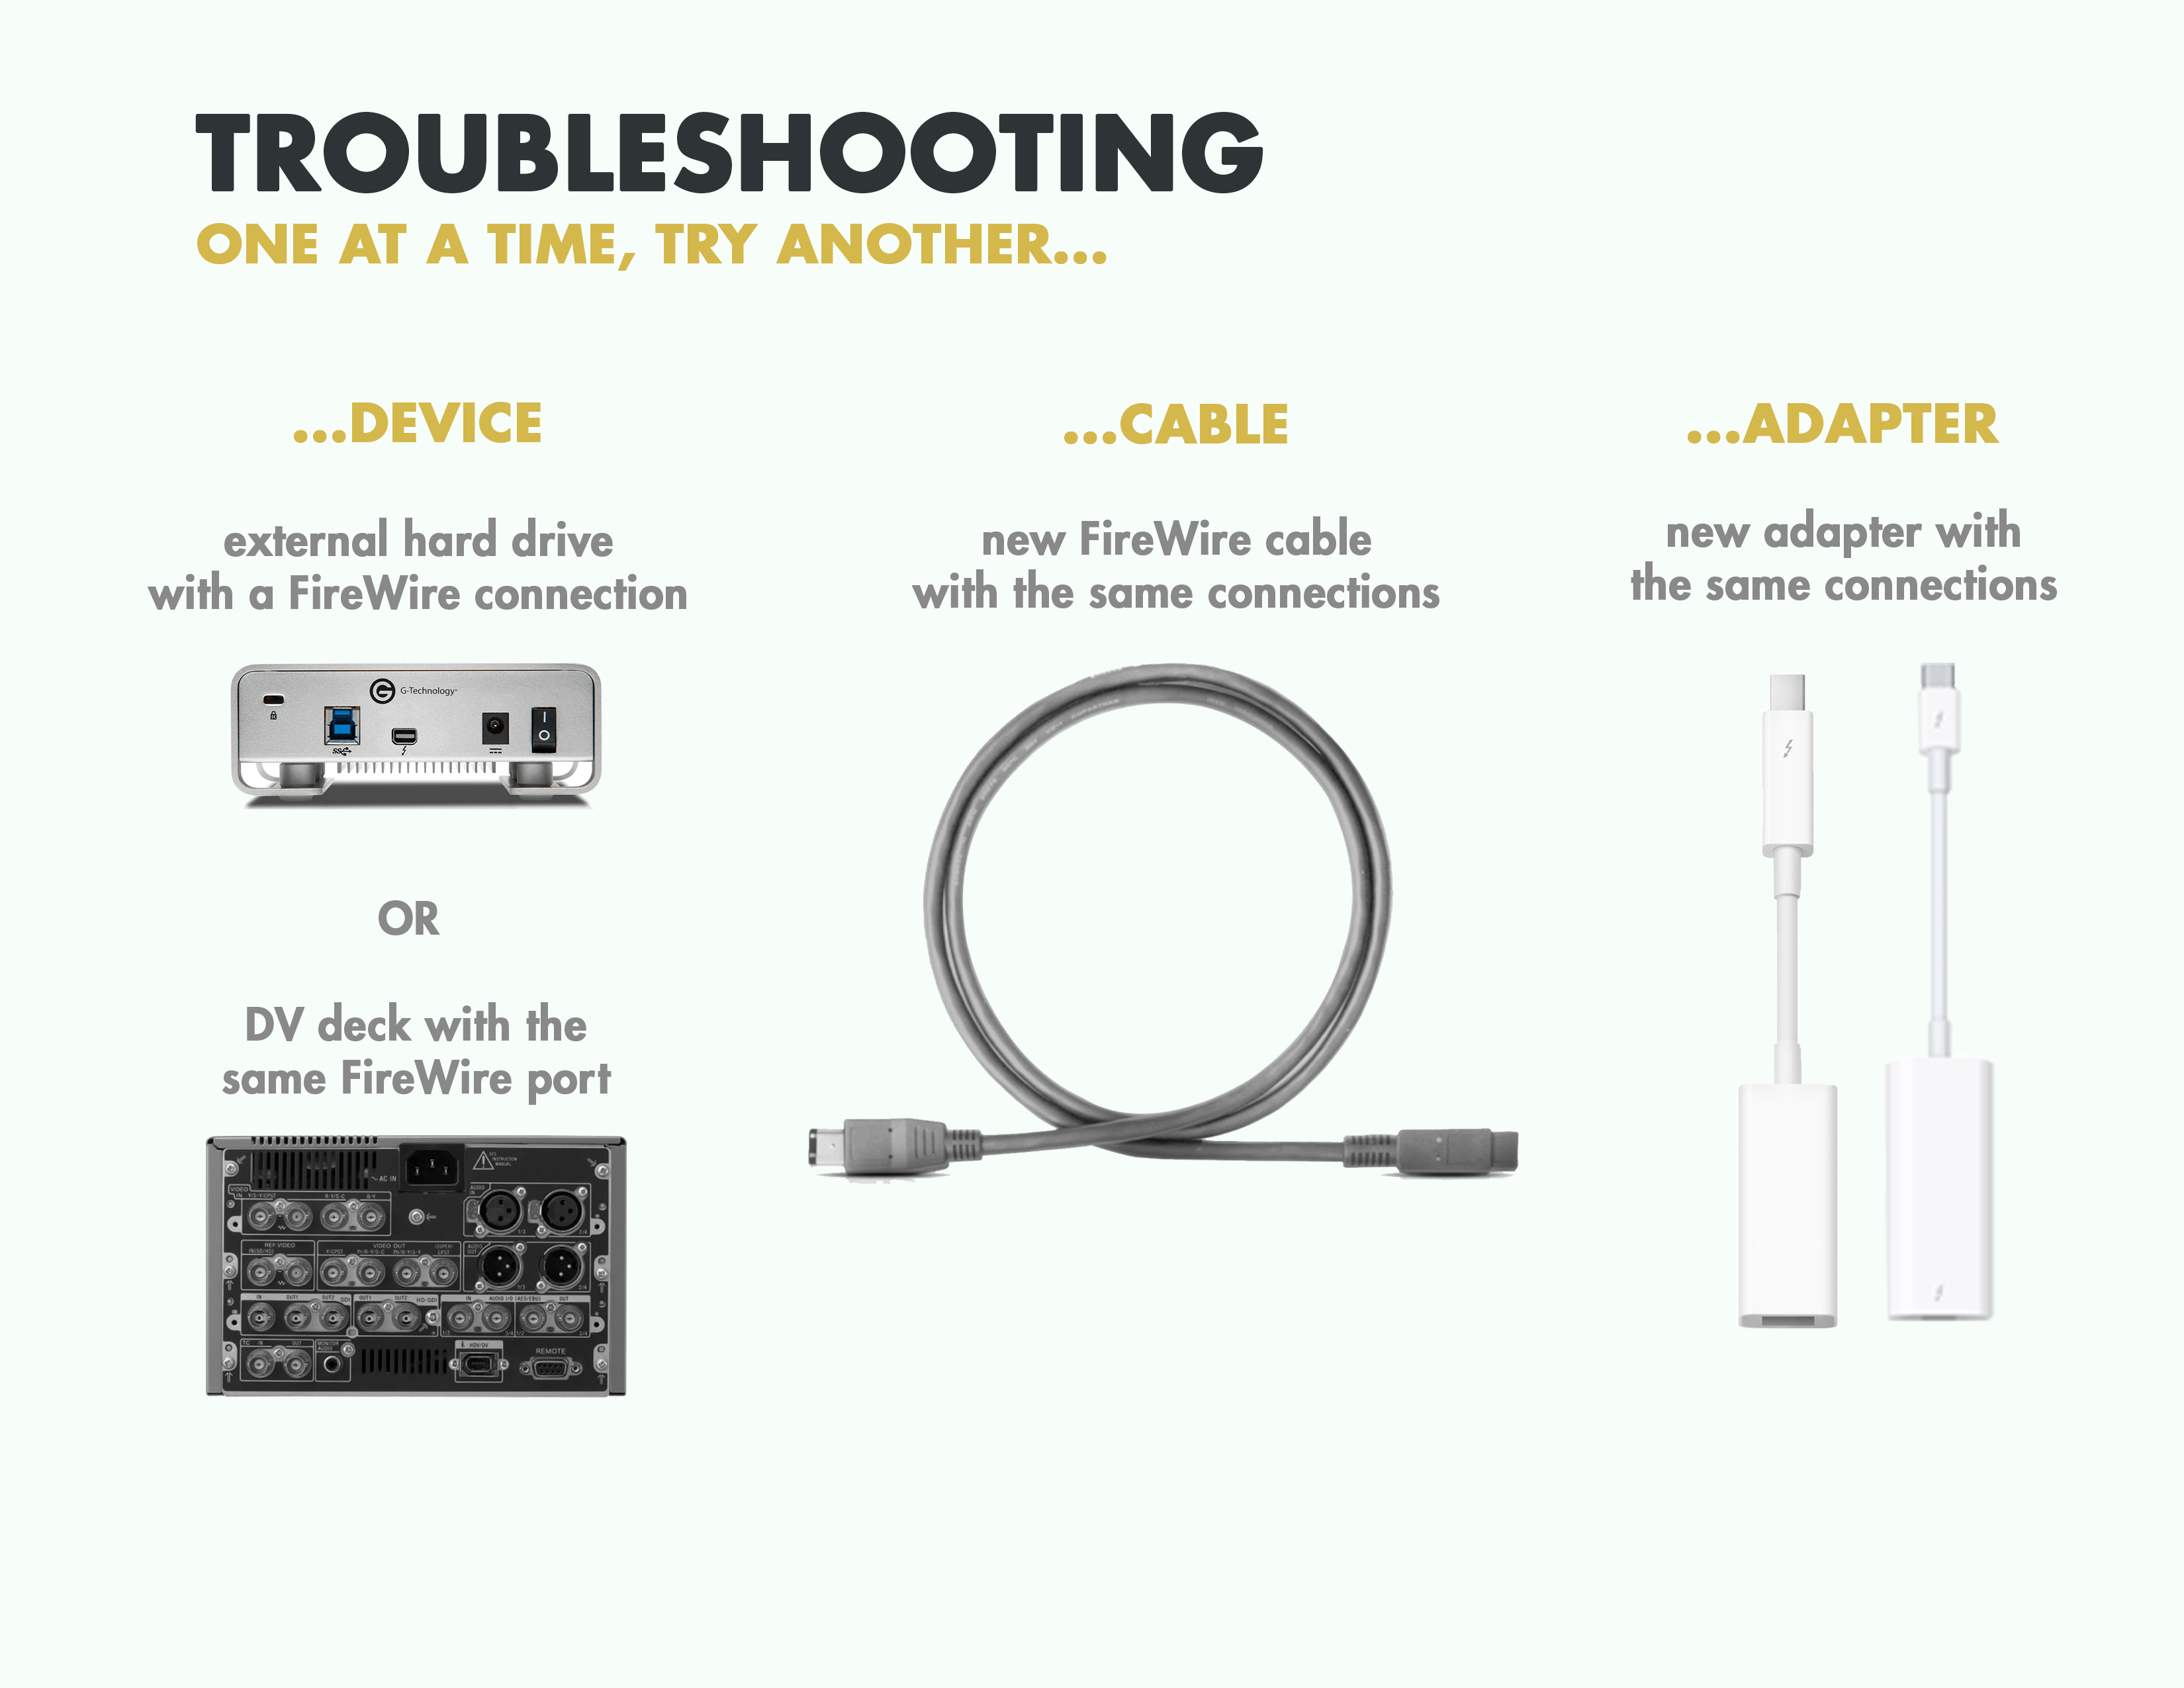
Try another device
- Try connecting your FireWire cable to either a different deck or another FireWire compatible device (such as a legacy hard drive or camera) and see if the device shows up (using the steps “Establishing Deck to Computer Connection” and “Restarting” sections above).
- If the second device shows up, there may be an issue with the first deck you were attempting to use (likely the FireWire output is broken).
- Try connecting the first device again. If it shows up, you are good to go. If it fails to connect, we would recommend having the device inspected for possible damage.
- If the second device does not show up, move onto the next section.
Try another cable
- Preferably using a brand new cable, re-connect your deck to the computer (either with or without adapters depending on your set-up).
- Repeat the steps listed in the “Establishing Deck to Computer Connection” section as well as the above troubleshooting steps, if needed.
- If the deck still does not show up, move on to the next section.
Try another adapter:
- If you are using more than one adapter, follow these steps for each one, switching out one at a time.
- Preferably, using a brand new adapter, try connecting your deck to the computer.
- Repeat the steps listed in the “Establishing Deck to Computer Connection” section as well as the above troubleshooting steps, if needed.
- If the deck still does not show up and you are using more than one adapter, try switching out the second one.
If none of these components can be pinpointed as the source of the issue, consider whether there might be a problem with your computer’s FireWire port. If you can, attach a different FireWire device. Alternatively, test the same setup using another computer.
Last resort
If none of this works, your problem may be more complicated. You can always visit the DVRescue GitHub page as a resource to see if anyone else is having similar problems or to ask questions and report issues. If you do want to report an issue, provide as much information as possible, including the devices and operating system you are using!
Permissions, Security Policy, & System Integrity Protection (macOS)
DVRescue requires some special permissions to access to operate and to capture DV videotape. (These are all also outlined in the Installation guide.) If any of these are not set correctly, they may block DVRescue from accessing connected devices to capture DV.
Guide
Recovery Mode Changes
Disable System Integrity Protection
To disable SIP, do the following:
- Restart your computer in Recovery mode. Methods will vary based on Mac model:
- Launch Terminal from the Utilities menu.
- Run the command
csrutil disable - Enter password if requested
- Restart your computer
Change the security policy
- Restart your computer in Recovery mode. Methods will vary based on Mac model:
- In the Recovery app, choose Utilities > Startup Security Utility.
- Select the system you want to use to set the security policy.
- If the disk is encrypted with FileVault, click Unlock, enter the password, then click Unlock.
- Click Security Policy
- Depending on the model of your computer, the Security Policy might be slightly different. Select your model:
M1 Mac
- Select Reduced Security: Allows any version of signed operating system software ever trusted by Apple to run.
- Under Reduced Security, there are two additional options. Ensure the box next to the first option is checked. If needed for remote access, check the second box as well:
- Allow user management of kernel extensions from identified developers: Allow installation of software that uses legacy kernel extensions.
- Allow remote management of kernel extensions and automatic software updates: Authorize remote management of legacy kernel extensions and software updates using a mobile device management (MDM) solution.
- Click OK.
- If applicable for multiple users/your computer settings: If you changed the security policy, click the User pop-up menu, choose an administrator account, enter the password for the administrator account, then click OK.
2019 Macbook Pro
- Select Medium Security: Allows any version of signed operating system software ever trusted by Apple to run.
- Under Medium Security, there are two additional options. Ensure the box next to the first option is checked. If needed for remote access, check the second box as well:
- Allow user management of kernel extensions from identified developers: Allow installation of software that uses legacy kernel extensions.
- Allow remote management of kernel extensions and automatic software updates: Authorize remote management of legacy kernel extensions and software updates using a mobile device management (MDM) solution.
- Click OK.
- Only if the computer has multiple users and you are not logged in as an admin: If you changed the security policy, click the User pop-up menu, choose an administrator account, enter the password for the administrator account, then click OK.
2017 Mac Pro
- Select Reduced Security: Allows any version of signed operating system software ever trusted by Apple to run.
- Under Reduced Security, there are two additional options. Ensure the box next to the first option is checked. If needed for remote access, check the second box as well:
- Allow user management of kernel extensions from identified developers: Allow installation of software that uses legacy kernel extensions.
- Allow remote management of kernel extensions and automatic software updates: Authorize remote management of legacy kernel extensions and software updates using a mobile device management (MDM) solution.
- Click OK.
- Only if the computer has multiple users and you are not logged in as an admin: If you changed the security policy, click the User pop-up menu, choose an administrator account, enter the password for the administrator account, then click OK.
- For all models, you must restart your Mac for the changes to take effect. Choose Apple menu > Restart. Allow the computer to restart as normal.
- Once the computer is fully restarted, go to System Preferences again: System Preferences/Security Preferences
- Click on the General tab. If the system software message is still present, complete the following steps.
- If it’s not already unlocked, click on the lock icon in the lower left hand corner of the window. Enter your password when prompted.
- Click “Allow” near the bottom of the window.
- Make sure to relock the lock to save the changes you have made to your Security Preferences.
- Restart your computer again.
Once the computer has restarted again, connect a DV device and turn it on. Open DVRescue and navigate to the Capture tab. See if the program detects your device and continue to follow the steps below.
Pop-up permissions
Rosetta (M1 only)
The first time you open the DVRescue GUI, a pop-up window may open that prompts you to install Rosetta. (This depends on your computer’s hardware and whether you have already downloaded Rosetta for another program.) Click “install” in the pop-up window.
Camera and screen recording access
- Click on the “Capture” tab.
- Plug in the deck you wish to use.
- Turn on the deck.
- When prompted, grant DVRescue permission to access your camera.
- You should get a similar prompt asking for permission for dvrescue to record your screen the first time you capture DV.
After granting these permissions, you will then be able to use all of the DVRescue tools in the GUI.
System Preferences permissions
Both dvrescue and vrecord require permission to access your computer’s camera and screen recording in order to capture DV. If for any reason the dvrescue installation does not prompt you to grant permission, you can fix the permissions manually for both programs:
MacOS 13 (Ventura) and older
- Ensure you are logged into your computer as an Administrator
- Open System Preferences
- Click on Security and Privacy
- Select the Privacy tab
- Fix Camera Permissions
- Select Camera from the list
- To make changes to the settings, you will need to unlock the lock located in the bottom left hand corner of the window. Click the lock and enter your password.
- If not already included, add both of these items to the list. You can do so by clicking on the + button and selecting each from the applications list:
- Terminal
- dvrescue
- If the Camera menu does not have the +/-…
- Drag and drop DVRescue from the Applications folder into the permissions window.
- You can add the Terminal and dvrescue to the Full Disk Access list instead.
- Alternatively, you can disable the permissions settings automatically in place with most macOS software by following the steps below for disabling system integrity protection. (This is advised in order to prevent additional permissions related errors or limitations.)
- Fix Screen Recording permissions
- Select Screen Recording from the list on the left hand side of the Privacy window.
- If not already included, add dvrescue to the list.
- Make sure the checkbox is checked.
Finally, reboot your Mac for all changes to take effect.
MacOS 14 (Sonoma) and newer
- Ensure you are logged into your computer as an Administrator
- Open System Preferences
- Click on Privacy & Security in the left menu
- Choose Camera
- You should have dvrescue and Terminal on the list
- If dvrescue is not listed, you must open dvrescue
- You should get a pop-up message as dvrescue requests access to the camera. Grant permission
- You should now see dvrescue listed in the Camera preferences and it should be toggled on
- Click the back button to return to Privacy & Security
- If for any reson the above doesn’t work (for example, Terminal is not on to the Camera list or dvrescue does not prompt for permission to access the camera) you may grant both programs full disk access instead
- Select Full Disk Access
- If dvrescue is not listed, choose the plus sign button at the bottom of the list
- Enter your password to authorize the changes
- Choose dvrescue from the Applications folder and open it
- Make sure it is added to the list and toggled on
- To add Terminal to full disk access, do the same steps. Terminal is located in the Utilities folder with Applications
- Return again to Privacy & Security
- You should have dvrescue and Terminal on the list
- Choose Screen & System Audio Recording
- Choose the plus sign button at the bottom of the list
- If dvrescue is not listed, choose the plus sign button at the bottom of the list
- Choose dvrescue from the Applications folder and open it
- Make sure it is added to the list and toggled on
Blackmagic settings
If you have Blackmagic Desktop Video, in Sonoma and newer operating systems, you may need to take extra steps to grant it permission to record. When you first install and open Blackmagic, it will prompt you to approve access in a pop-up, but this alone will not correct the settings.
- Add Blackmagic Media Express to Screen & System Audio Recording in the same manner as dvrescue, above
- Go to General in the left menu
- Click on Login Items & Extensions
- Under Extensions, locate Driver Extensions. Click the info circle on the right side
- Toggle Blackmagic Desktop Video on, toggle on, and click Done to save
- Do the same with Camera Extensions
Finally, reboot your Mac for all changes to take effect.
Firewire permissions (Ubuntu)
Guide
Github Issue: Firewire permissions issue in Ubuntu 22.04
After upgrading to 22.04, there may be a change in levels of permission that disables Firewire devices for a user. This blocks dvrescue components such as dvcont and FFmpeg from communicating with the deck.
Solution was found in another forum:
Make a /etc/udev/rules.d directory:
sudo mkdir /etc/udev/rules.d
Next define a new rule:
sudo -s
echo 'KERNEL=="fw*", GROUP="video", MODE="0664"' > /etc/udev/rules.d/80-firewire.rules
exit
Then user needs to be added to the video group with usermod -a -G video USERNAME
dvcapture via vrecord
Guide
If you are using dvcapture through vrecord, in general please refer to the vrecord documentation on GitHub for troubleshooting. However, there are a few known issues:
Bitstream Error Concealment

If vrecord detects that the DV device is concealing bitstream errors, this will be noted in the Terminal. Error concealment is a built-in function of DV tapes/deck communication.
vrecord Permissions Error
If you receive the following error while capturing via vrecord using macOS 10.14.6:
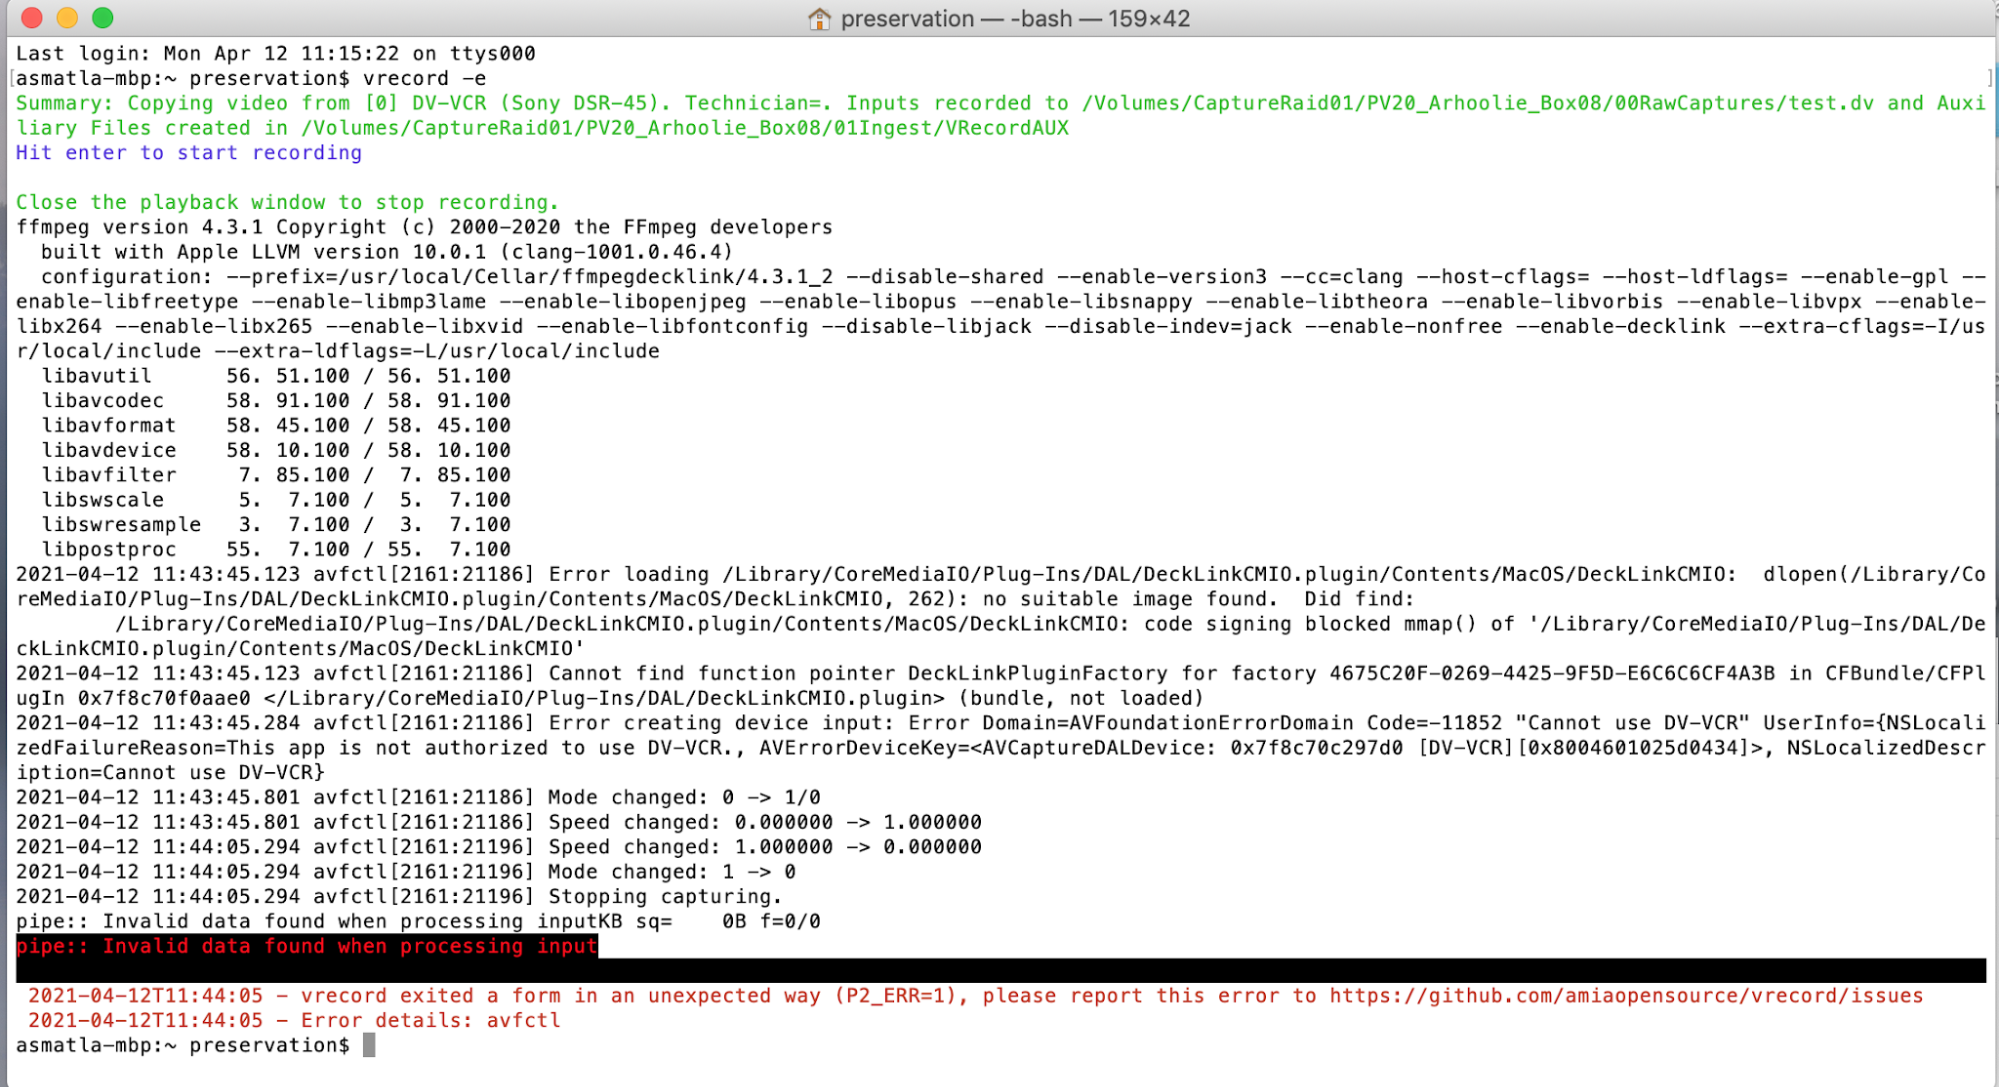
The key part here is “this app is not authorized to use DV-VCR” (the name of the deck noted in the error will reflect the one you selected from the list in the vrecord “Edit Settings” menu).
You will need to change the OS camera permissions by following these steps:
- Ensure you are logged into your computer as the Administrator
- Open System Preferences
- Click on Security and Privacy
- Select the Privacy tab
- Select Camera from the list on the left hand side of the window
- To make changes to the settings, you will need to unlock the lock located in the bottom left hand corner of the window, by clicking on the lock and entering your password when prompted.
- If not already included, add the Terminal to the list, by clicking on the + button and selecting it from from the applications list.
- If the Camera menu does not have the +/- you can add the Terminal to the Full Disk Access list instead.
- Reboot your Mac for the changes to take effect.
Packaged .mov file will not open in QuickTime
Guide
After packaging your .dv files into .mov, you may try to open them and get an error like “The document “[filename].mov” could not be opened. The file isn’t compatible with QuickTime Player.” .mkv files should still work fine. This may occur most consistently when using the CLI, but may also happen in the GUI.
The issue arises from ffmpeg misdetecting the frame rate of the .dv file. This issue was reported to ffmpeg, but cannot be directly fixed by dvrescue’s developers.
Until it is resolved, you can downgrade your ffmpeg version to 6.0_1. Hold off on updating to a more recent version until the problem has been resolved by ffmpeg.
You can read more about this issue in the MOV-ffmpeg tag in DVRescue issues on GitHub.